Graham Mayor
... helping to ease the lives of Microsoft Word users.
 |
 |
 |
Many people access the material from this web site daily. Most just take what they want and run. That's OK, provided they are not selling on the material as their own; however if your productivity gains from the material you have used, a donation from the money you have saved would help to ensure the continued availability of this resource. Click the appropriate button above to access PayPal.
Mail Merge 'Many-to-One', 'One to One' (both including Merge to E-mail with Attachments).
Word's Form Letter Mail Merge is strictly
One to One. This means that one document is produced for each
record. This add-in allows that kind of merge to the printer,
but also includes various options that are not available from
the Word function, especially a merge to separate documents and
to e-mail attachments.
This add-in also offers Many to One merge capabilities i.e. data
from several records may be included and presented in the same
document.
Illustrations on this page may be from earlier versions than the version currently available for download as shown in the title bars of the userforms.
IMPORTANT NOTE: The download
link for the add-in is at the foot of this page, and is not
associated with the advertisements, which are
context and location sensitive.
The facilities offered by this add-in are complex, so please read the content of this page before
downloading and attempting to use the add-in.
The featured add-in thus provides the following functions:
- Many to One Merge to e-mail or separate Word documents or PDF format documents or to the printer.
- Many to One Mail Merge with attachments to e-mail.
- One to One Mail Merge to e-mail or separate Word documents or PDF format documents or to the printer.
- One to One Mail Merge to e-mail with attachments.
- Mail Merge graphics (with provisos shown below.)
- Mail Merge bar codes (with provisos shown below)
Where the open source PDF creation tool PDF Creator is installed, additional options to use PDF Creator are available for both Many to One and One to One merges. PDF Creator additionally offers the option to add security measures to the merged PDF files, which are not available to Word's built-in PDF Creation function. The PDF Creator functionality is described in the last section at the end of this page, followed by the download button.
The add-in requires that the data source
is an Excel worksheet, with a header row starting at
cell A1 and that Outlook is available and configured as the
default e-mail application in Windows to send the messages.
As a separate project, I
have also produced a tool to make it relatively easy to extract
Outlook Contacts data to an Excel worksheet should it be
required to use Outlook data with this add-in.
Note that the processes of this add-in do not constitute a true mail merge.
Word's mail merge function is only used as a convenient way of
placing the variable data for the finished documents.
The function processes the
complete record set serially. If you require a filtered record set,
then for preference you should filter in Excel and process the filtered worksheet
as the data source. However I have added a simple optional filter,
switchable from the 'Configure Options' button on the add-ins
ribbon tab, which provides filter tools, to
limit the record set to be merged based on the content of up to
four fields. Context sensitive help is provided.
Do not use the address block field in your document and do not
include blank columns or rows in the worksheet used as a data
source.
Error trapping in the add-in will detect when the worksheet is
incompatible and will attempt to point out where the problems
lie.
OUTLOOK ACCOUNTS -
IMAP
If outlook is not configured to have a local PST file, other than the
IMAP caches, it stores all the draft messages within the drafts folder
of the IMAP account. Most providers don't allow you to have
subfolders of these special folders within IMAP accounts. So the
process will not be able to create the required subfolder, but
instead creates all the mails to be sent directly within the drafts folder.
If there is a local PST file, but not set as default data file
(instead setting an IMAP file as default), the process will
create the Subfolder within this local file, but stores the
mails to send within the drafts of the default IMAP data file.
POP accounts should not be affected by this issue.
The add-in is provided in the format of a macro enabled template which should be installed in the Word Startup folder (with Word closed) so that it loads with Word and makes its commands available to the Mailings Tab of the Word ribbon.
The add-in is also provided as a self executing zip file, which will install the add-in and remove older versions.
The add-in has its own ribbon tab with the following command set:
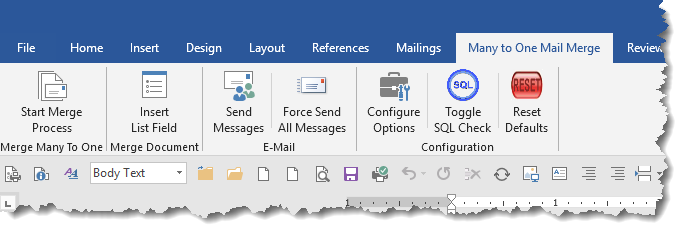
- Start Merge Process - runs the Process
- Insert List Field - The add-in allows the use of a separate list of a single child field to be included. The intention is to facilitate
the insertion of sets of signatures in contract (etc.) documents, though it can be used to list the contents of any single child field.
This option works in conjunction with a rich text content control positioned as required in the document. The button will insert the appropriate rich text content control, titled 'List Field', with the required syntax to display the content of that variable at the cursor position. The use of the List field is describe later on this page.
- Send Messages - Sends the e-mail messages created by the application to the intended recipients. This option provides an opportunity to delay the send time of the messages.
Be aware that clicking the 'Send Messages' button will send
ALL the messages in the application's temporary folder to the Outbox- INCLUDING ANY
TEST MESSAGES YOU MAY HAVE LEFT THERE!!! If Outlook is configured to
send messages immediately, then all those messages will be sent.
No messages are sent from the application other than by clicking
this option.
- Force Send - All messages - This is aimed at messages which appear to be stuck in the Outbox.
Instead of having to open and send each such message again, the function aims to automate that task. It does not affect messages
in the temporary folder created by the add-in. For that you should use 'Send Messages', the first item in the menu.
- Configure Options - This button recalls a process to allow the setting of
some defaults The configuration is called automatically after
installation, following an update to he add-in, or whenever the user changes.
- Toggle SQL Security check - When a
merge document with a data file attached is opened, by
default Word
displays a security message. This button toggles a registry
value that controls the display of the security warning -
see the yellow panel below for more information.
- Reset Defaults - The application stores various
settings in the registry. This button removes the registry
values created by the application.
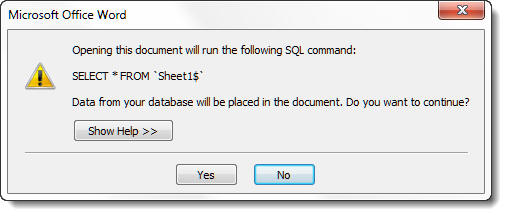
Microsoft's Windows security produces the
following warning message when the merge document is opened and
its data attached.
The security measure that produces this
warning can be disabled by a simple registry change
(see Toggle SQL Security Check above), but I realise that
company IT departments may be reluctant to permit such a change,
so you may see this message more than once when using the
add-in.
This warning, apart from being annoying, should not affect the
working of the add-in, though some users have reported problems
attributable to it.
Configure Options
When the add-in is installed and run for the first time, the process starts by displaying a userform to set some preferences. You can redisplay the dialog as required from the ribbon button.

Earlier versions would check whether Outlook was installed, however as the latest versions of Office have Outlook installed, I have included a manual confirmation. For the e-mail options to work, Outlook must be the default e-mail application and the check box must be checked.
Show Filter Dialog at Start is self evident. With the check box unchecked. The filter is not shown and all the records in the set are processed.
E-mail validation may be disabled. It is strongly advised that you don't check this option unless you use an Exchange Server with recipient nicknames that are not recognised by the add-in as e-mail addresses. This option is only enabled if the Outlook check box is checked.
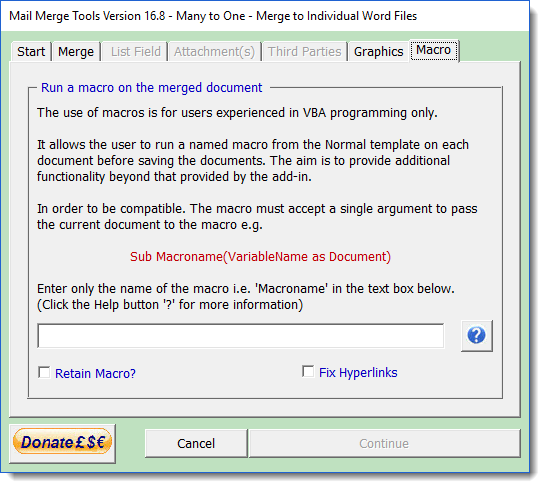
The add-in has included an option to enable the use of a macro to be run before saving the individual documents for some time, though in some versions it had not been enabled for most users. This version has that option enabled if checked in the configuration. Support for creating macros is not provided.
Where macros are enabled in the configuration, an additional tabbed page is available on the main program dialog with options to include a macro and to 'Fix Hyperlinks' This latter option should not be required by most users, but if hyperlinks are not resolved correctly, it can be checked to address that issue.
The hyperlinks option, can affect the layout of some complex documents so should be used only when necessary.
It has been found that where the '#' symbol is used in the data, it can cause the process to misread the following data. The add-in therefore detects the use of the '#' symbol and stops the process. This hash check may be disabled, but should you do so, check the results thoroughly, especially if you are sending the merges to e-mail, where incorrect data may be sent out and cause embarrassment.
The add-in allows the use of PDF Creator version 2.5 to be used to create more secure PDF files, when that application is installed. Do not check the box if PDF Creator 2.5 is not installed.
PDF Creator is not required in order to use this add-in, and the version 2.5 for which code sequences are included is not the most recent version of the add-in. The current version if not compatible with this add-in, and if installed the check box must not be selected.
Mute sounds. The add-in uses sounds as alerts throughout for messaging etc. Some users prefer to work without such sounds so the option is included to mute them
he temporary folder is set by default as a sub folder of the user's TEMP folder. For this reason when the process detects a new user, the dialog is shown and the new user's TEMP folder is displayed.. You can change the folder to a location of your choice, but there is no need to do so.
Previous versions prompted each time for the location to save the document. The dialog now requires the user to set a folder to save the documents to. The folder selected will become the default for future merges using the add-in. You can change it by re-running the configuration from the ribbon button.
Each of the options in the configuration dialog is accompanied by context sensitive help displayed by clicking the '?' buttons alongside the check boxes. Similar help buttons are available throughout the process.
Many to One
The mail merge function in Microsoft Word works only with a flat data file as a 'One-to-One' merge i.e. a separate set of values for each record in a single document. There have been various approaches proposed to enable the merging of lists associated with records that share a common 'key' field - for example a list of purchased items from a particular customer where multiple separate product items are associated with each customer. Microsoft's own suggested approach is quite complicated and recorded at 'How to use mail merge to create a list sorted by category'.
Fellow Word MVP Paul Edstein has posted a tutorial on this, with working field codes and a sample Excel data source which you can download from this web site but it can be a tad bewildering and even Paul would concede that creating this type of merge can be intimidating for those unskilled in mail merge.
To overcome this difficulty another Antipodean MVP and occasional contributor to this site, Doug Robbins, produced an add-in to attempt to simplify the process. I developed the principles Doug had come up with to form the basis of my original Many to One add-in, which is now replaced by the completely re-designed add-in described on this page.
If there are likely to be some rows with no data, in some of the Excel data source fields, all of the cells that represent the data source must be formatted as text. Otherwise, errors can occur, when the routine encounters a type of data that it is not expecting.
For Many to One to function correctly, the data must be sorted by the field that is going to be used as the key field. Not sorting it that way will not cause an error, but the desired result will not be achieved.
The merge starts a new document each time the key field changes, which feature is used to different effect in the One to One options, but more of that later.
When merging to e-mail, ensure that the e-mail addresses are in a valid format and that all the records have a valid e-mail address. The add-in will detect invalid e-mail addresses. Where records do not have a valid e-mail address you must correct the address, replace it with a valid address (such as your own e-mail address) or use a dummy address as in the example data supplied with the add-in.
When merging to e-mail, the application should start Outlook, if it is not already running, but such is the relationship between the Office products that this may not happen. It is therefore advisable to start Outlook before running the application.
The appropriate add-in should be should be extracted to the Word start-up folder. By default the start-up folder location is a hidden location, but it can easily be located by typing %appdata%\Microsoft\Word\Startup in the address bar of Windows Explorer or your Internet Explorer browser.
For the purpose of explanation of the use of the add-in, a sample document and an Excel data source are included in the zip file. An extract of the relevant part of the merge document is included below.
The merge document must be set up as a conventional letter merge with the Excel data file attached as its data source. The example document is supplied as an ordinary Word document.
The messages created by the application will go to a sub folder of the Outlook account Drafts folder called 'Merge Many To One'. Messages are only sent when you choose to send them. If you have the option set to send messages immediately when connected, then that is exactly what will happen, so do not do that unless you really do want to send the messages to the recipients indicated in the data file.
The example data supplied with add-in contains dummy e-mail addresses and so it will not matter too much if you send the messages. They will only be bounced back with a delivery failure error.
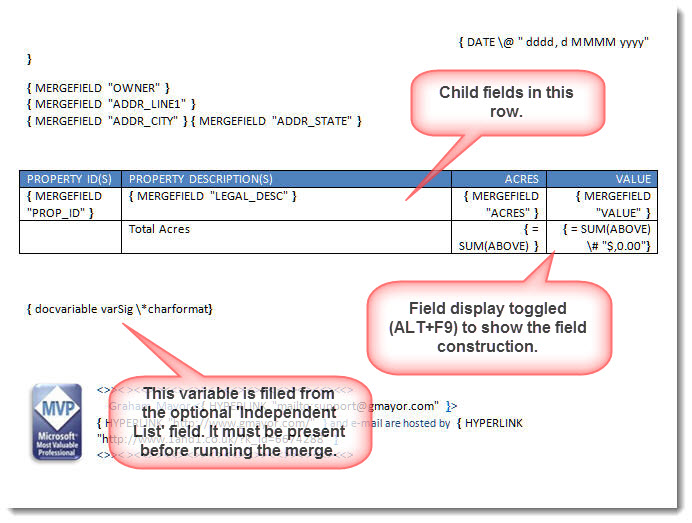
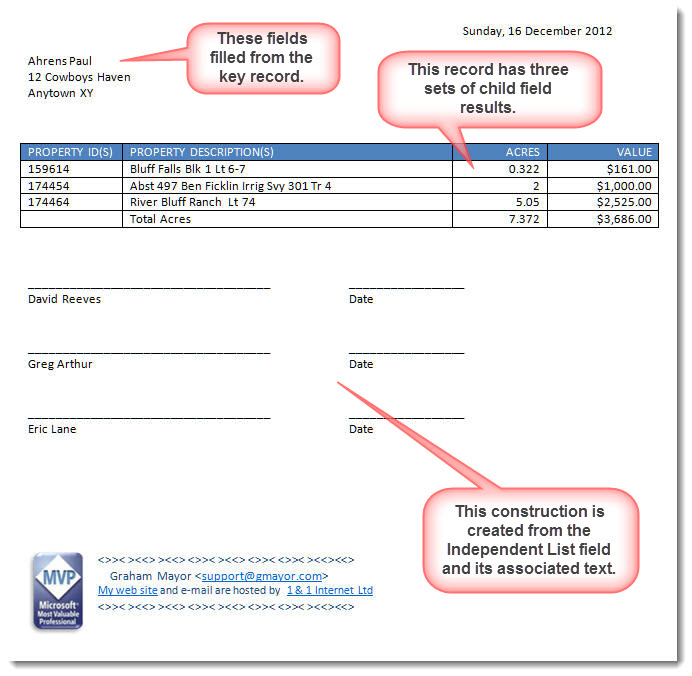
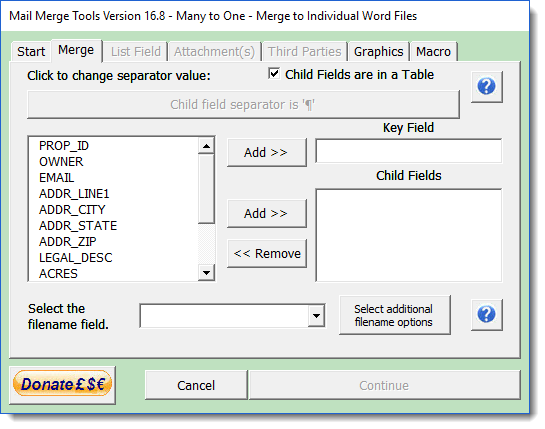
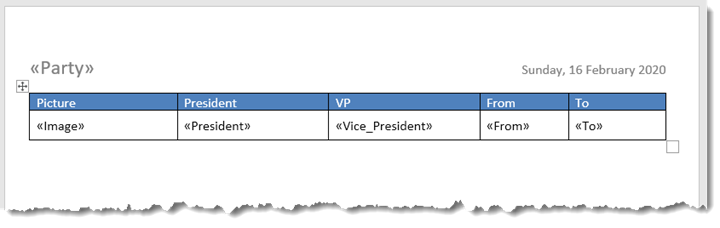
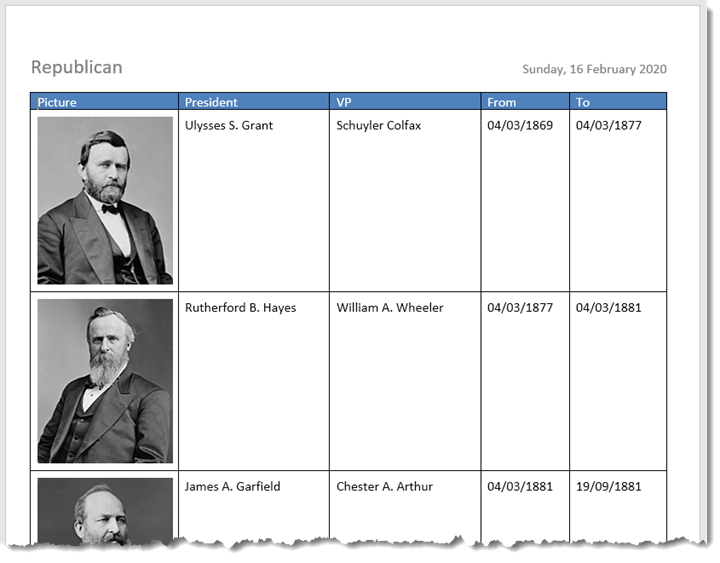
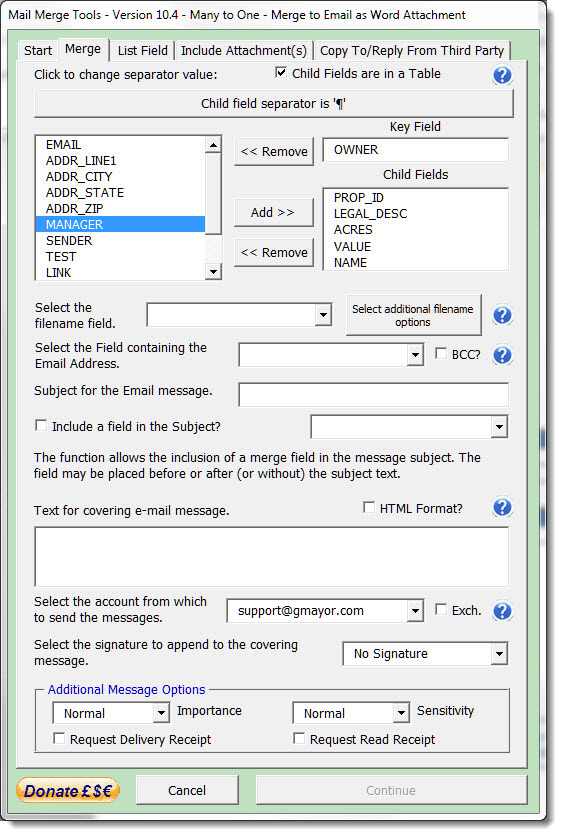
With the example document, the 'Key field' is OWNER and the 'Child fields' are PROP_ID, LEGAL_DESC. for the totaled fields ACRES and VALUE. and for the List field NAME.
The fields are inserted in the document as shown in the next illustration. They do not have to be placed in a table, but a table format is ideal for lists.
The intended result is shown in the lower illustration of the two illustrations that immediately follow. Note that only one set of each of the “repeating” fields (PROP_ID, LEGAL_DESC, ACRES and VALUE) is required in each location where that data may be reproduced as shown in the table of the first illustration. Fields not designated as child fields will be reproduced from the first record that matches the key field. In the example document, those are the fields of the address.
Formatting switches
This is not a mail merge application. The whole thing is created in VBA. The merge fields are used purely as place markers that reflect the field names in the data source. For this reason it is not possible to use formatting switches with the 'Child fields' in a Many to One Merge.
You may use switches with fields that are not 'Child fields', and include such fields in conditional constructions, but when doing so bear in mind that the merge fields are converted to docvariable fields during the process and as docvariables cannot contain a null value, any field in the data source that has a null value is replaced in the docvariable field with a zero length space ChrW(8203)
Totaling the values in the columns.
With lists of items, it is often desirable to provide a total of the values of one of more of the listed fields. This can be done quite simply, subject to two provisos.
1. That the values returned from the data source are numbers. It may be stating the obvious but you cannot total values that are not numeric.
If you want numbers with currency symbols in the lists, then the
currency symbols must be provided by Excel fields formatted
as text in Excel c/w with those currency symbols.
Where the user does not have the option of editing the data
directly, it may be possible to make a copy of the data and edit
that for use as a merge data source.
As an aid to formatting numbers and dates formatted and displayed in Excel as text, you could use the following Excel macro. Select the column(s) to be converted and run the macro:
Dim oRng As Range, sText As String
For Each oRng In Selection
If Not oRng.HasFormula Then
sText = oRng.Text
oRng.NumberFormat = "@"
oRng.Value = sText
End If
Next oRng
lbl_Exit:
Exit Sub
End Sub
2. The list of values is in a table column. In the example shown below the Child Field 'Value' is inserted in a table cell. The function will build sufficient rows for the child fields, as shown in the third of the following illustrations.
When both conditions are met, you can add an Expression (=) field to a final row of the table. This field can be formatted using switches as required. The fields to be added - here 'VALUE' may not be formatted with switches. If you do so the range of values in the column will simply be added together.
IMPORTANT!!! Do not use nested tables
(i.e. tables inserted within other tables) when creating your
merge document and do not use merged cells in the table used for
the child fields or the function will not be able to create the
extra table rows required to display the child data.
Only child fields may be used in any table used in a 'Many to
One' type merge document (it doesn't matter for 'One to One'
type merges) .
Do not put common (non-child fields) in any other table in the
document. This is error trapped in the add-in, but I seem to be
constantly playing catchup with error trapping of issues that
users present. If in doubt only use one table in your merge
document.

Running the Merge
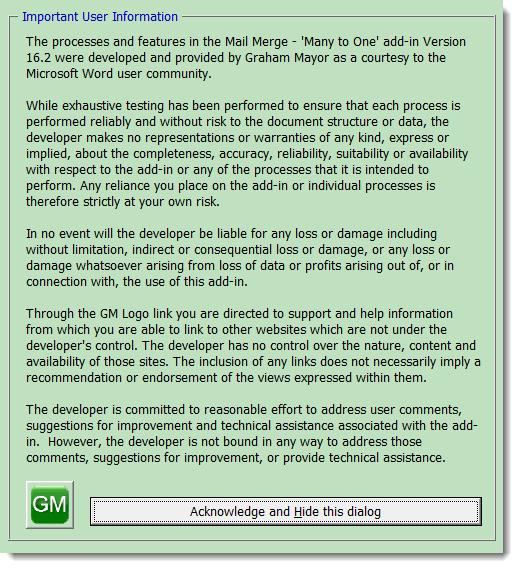
Having setup the merge document and data source, the next step is to run the macro. The function begins by making a range of checks to ensure the viability of the merge document and the worksheet attached as its data source. A range of messages informs of any anomalies that may be found. Should all the tests be passed, the first time the add-in is run, it displays the disclaimer text similar to that used in all my add-ins. Please take a moment to read it.
When the disclaimer is dismissed, if the Filter option in the configuration has been set, a Filter dialog will be displayed. This is a simple filter that allows users to merge only selected field values. You may only choose one value from each of four fields.
The dialog is populated with the fields from the data set, and text entered in the text boxes is not case sensitive. If a field is selected, and text entered associated with that field, the check box alongside is automatically checked. Only checked filters will be applied to the data set.
If a field is entered then subsequently unchecked, the entry is removed and the list moves up to fill the empty space.
The filter uses a 'Like' comparison so you may use wildcards in the values to be searched. E.g to merge only records beginning with (say) "A & " (there are two such records in the example files) enter A &* in the search field.
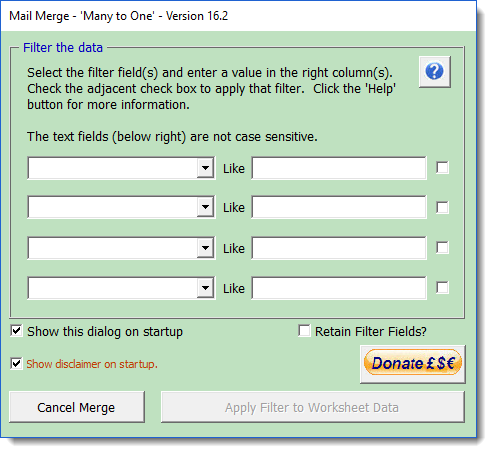
With large data sets, the filtering (which works by creating a temporary copy of the worksheet and document and removing records from the temporary worksheet, thus the original worksheet remains unchanged) can take a while to complete. I have therefore added a progress indicator to the filter.
Cancelling at any stage of the process restores the original document and data.

The main multi-page userform is then displayed. From this page you can select from a variety of merge options.
Your choice of Merge Many to One or Merge One to One is retained between merges, as most users will tend to repeat the same type of merge. The change is stored when you click the 'Continue ' button.
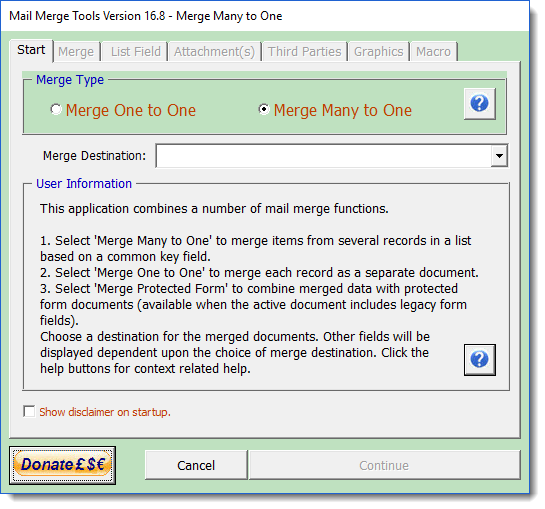
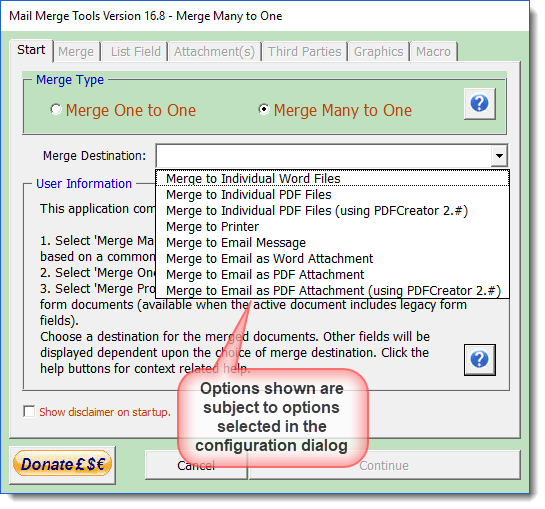
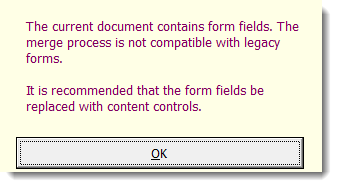
If the merge document contains legacy form fields the process will be cancelled.
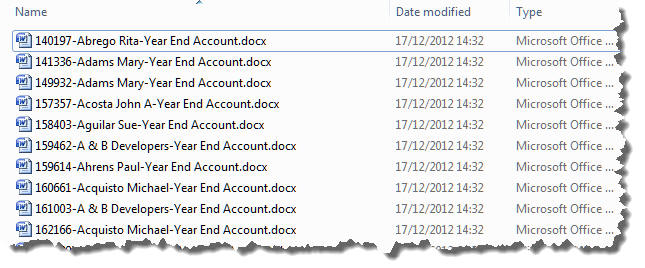
Merge to Individual Files
A One to One merge to individual files provides an alternative approach to splitting merges into separate files from the Individual Merge Letters add-in. It provides a similar range of functions, except that it does not offer the option to merge using Adobe Acrobat where present, and unlike the other add-in it does not use mail merge to process the documents. This can produce better results than the Individual Merge Letters add-in - especially with documents that contain complex tables and/or several sections.
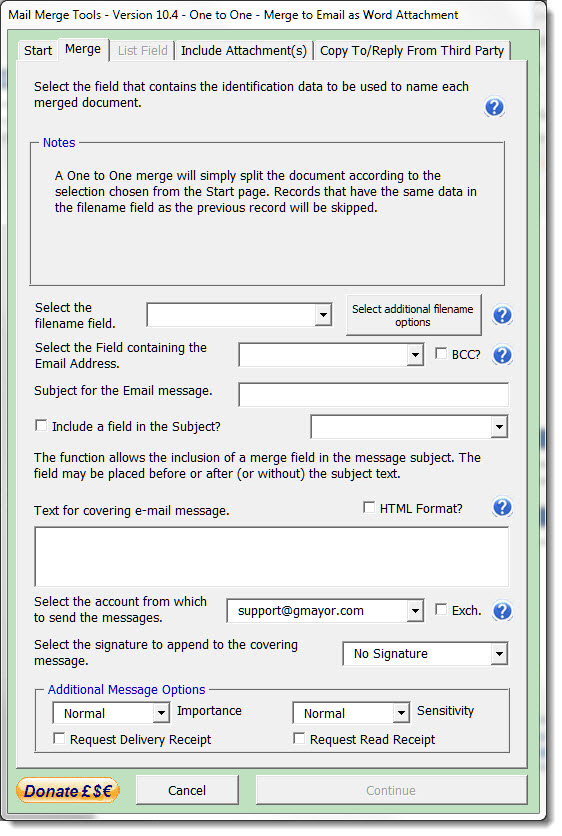
The dialog for the One to One merge option is relatively simple. it merely requires the selection of a field for use in naming the document. Apart from the title bar captions the dialogs are identical whether merging to Word documents or PDF.
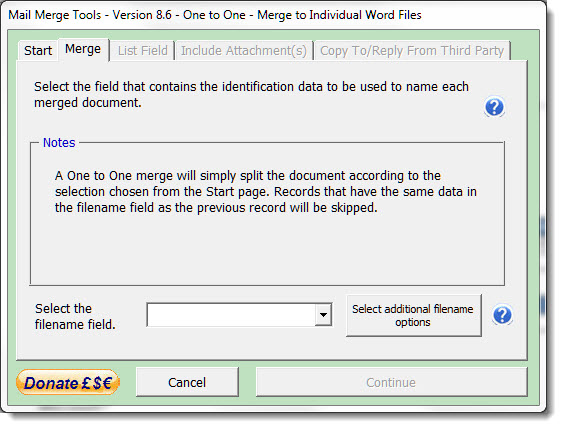
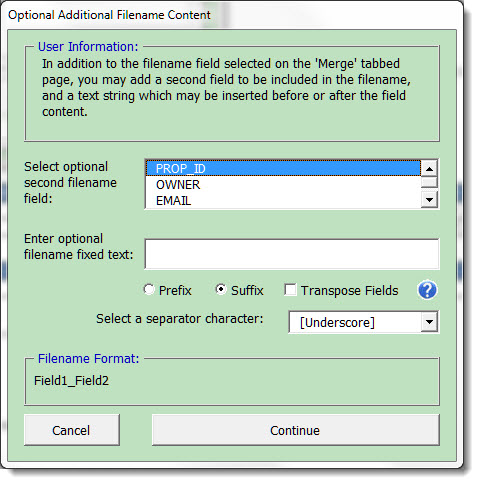
The dialog includes a button marked 'Select additional filename options'. This provides the opportunity to add a second field value to the filename and/or accompanying text. That text can be placed before or after the two fields, with a choice of separator character between each element. The field order can be transposed if required. This may be important in the case where the filename field is also the key field.
The dialog indicates the format of the filename (see below). Not indicated is the filename extension, which will be PDF or DOCX according to the initial selection of the merge type.
IMPORTANT!
As this add-in also provides functionality for Many to One mail merges,
it is imperative that the initial filename field chosen has unique
data in consecutive records. The function will produce a new
document ONLY when the value in the filename field in a One to One
merge changes. If the value in the filename field of the following
record is identical, then the following record will be skipped.
There are no additional options for a merge to individual documents and so click 'Continue' to run the process of creating the separate document.
You will have to select a location to store the documents in the next dialog, or they will be created in the current document folder.
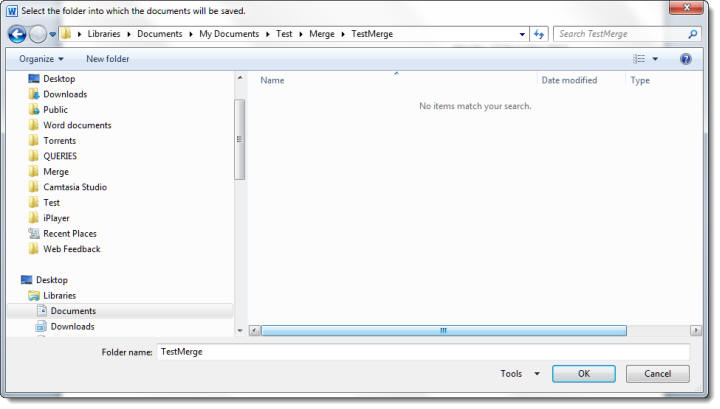
Click OK and the merge creates the documents in the chosen folder. As nothing much appears to be happening I have added a progress indicator.
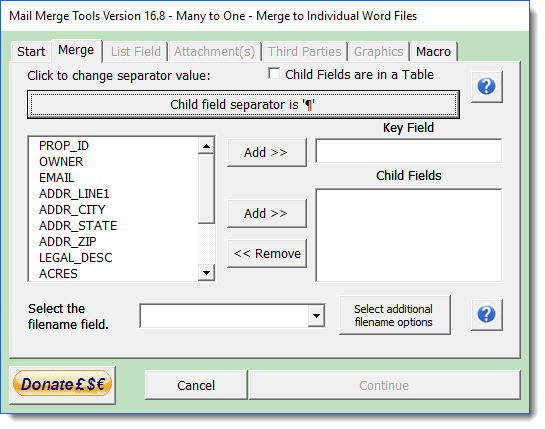
Merging with the Many to One option to individual documents provides a few more options and introduces the concept of a 'Key' field and associated 'Child' fields. The 'Key' field is a field that contains data related to all the records in the set. The 'Child' fields are those fields from the set that are to be listed.
The list can be in a table, which will be ideal if you wish to calculate totals for values, or it can be a plain list, one to a line, or a continuous list.
Where the list is not in a
table, you can choose the separator character and whether to use
'and' or 'or' as the separator for the last item in the list.
e.g.
- Value1
- Value2
- Value3 and/or
- Value 4
Or
- Value1, Value2, Value3, and/or Value4

Independent List Field
The Many to One merge provides for a single child field to be used to create a separately formatted list, regardless of whether the child field has already been used in a table or list elsewhere in the document. Access to this option is found on the List Field tab.
Such a field may have a variety of uses, but it was envisaged that it would be used for providing signature blocks for legal documents where several parties would sign the document.
In order to employ this field in the document, it will be necessary to insert a rich text content control, with the title 'List Field' at the position(s) where the list is to be displayed. Clearly this content control must be present before the merge process if run.
The field selected as List field is a Child field so must have been selected as a Child field on the main page of the Userform. Only Child fields are available for selection on the List Field page. If the field you want to use is not available for selection, return to the Merge tabbed page and select it as a child field.
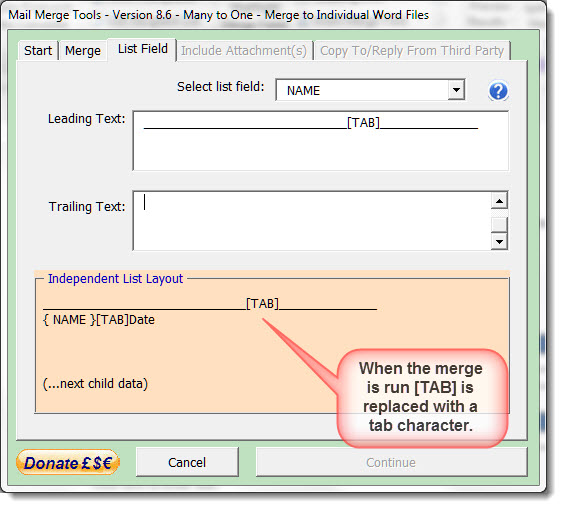
You can use any text in the Leading and Trailing text boxes to give the spacing you require. Note that if you type [TAB] in either text box, this will be substituted by a tab character when the merge is run. The Independent List Layout does not indicate the actual spacing provided by the tab setting applied to the paragraph containing the DocVariable field so you may need to establish what leading and trailing text is required to give the effect you seek, before running the merge. See the two illustrations below which indicate how the function is applied in practice.

Merge to Printer
A One to One merge to printer is include for completeness. In practice you would probably use the Word mail merge function to merge to printer. The main advantage of this function is that each document is treated as a separate print job, which can be of value when printers include stapling functions.
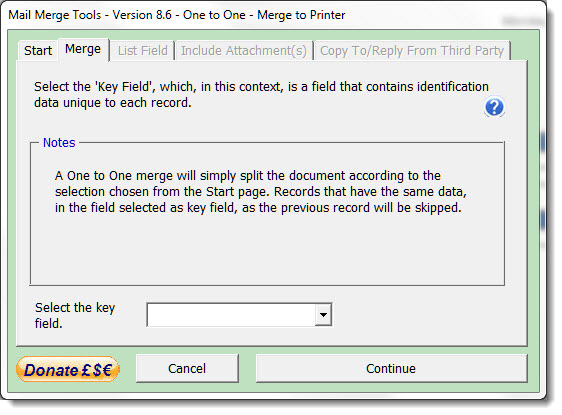
Merging to printer with this function requires a key field. This may be any field in the merge document which has a value for each record and which value is different in consecutive records. It does not matter if the same value is duplicated in a subsequent record, but the function only creates a new document when the value in the key field changes.
A Many to One merge to printer provides the additional functions relating to the use of Child fields outlined in the previous section.
Merge Graphics
As the Many to One add-in is not a mail merge application, merging graphics from child fields is not simply a matter of inserting the correct syntax as discussed at Mail Merge Graphics. I have therefore incorporated a process to convert a merged graphics path that points to an existing file, inserted into the child field table.
Note that this facility is only available for Many to One merges where the child fields are in a table as in the following example:
Where it is desired to merge a graphic in the BODY of the document, the correct merge syntax as discussed at Mail Merge Graphics must be used and the field must NOT be declared as a child field.
To restrict the size of the images, ensure that the columns are set to fixed width. The images will then shrink to the width of the coilumn.
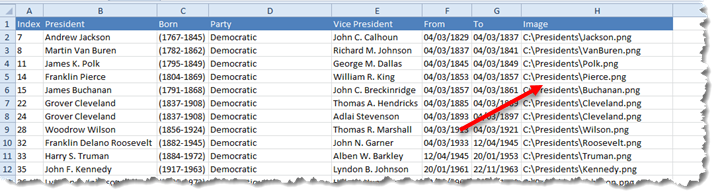
The data file for this would be something like the following, with the paths available on a local disc
The add-in features an additional tab
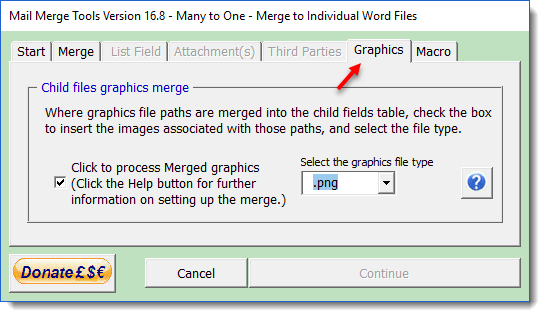
Checking the check box populates a combo box with popular graphics file extensions. The extension helps the process locate the file path in the table, so it is essential that all the graphics merged are of the same format and the extension selected matches that format.
If either of the above conditions is not true, or the file path indicated is no longer valid, the file path only is merged.
For one to one merges, or for graphics that are not related to child fields, use the syntax discussed at Mail Merge Graphics (or use the associated add-in) to insert the fields. The add-in's graphics option is not relevant to such use.
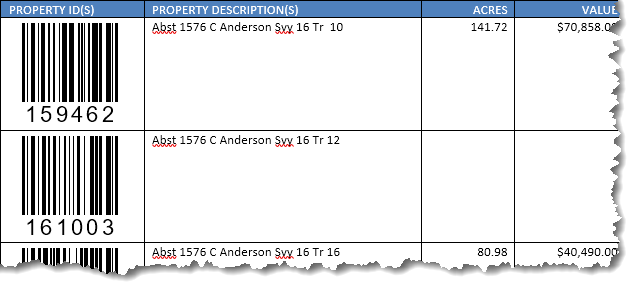
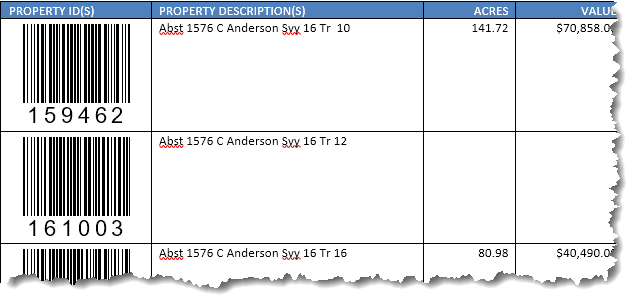
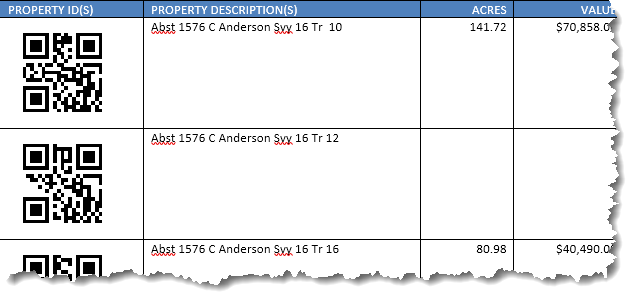
Merge BarCodes
As the Many to One add-in is not a mail merge application, merging barcodes (as with graphics above) is not simply a matter of inserting the correct syntax as discussed at Insert Bar Code. I have therefore incorporated a process to convert a merged field, inserted into the child field table. Note that this facility is only available for Many to One merges where the child fields are in a table as in the following examples.
Because the process is not a true mail merge application and the merge fields are used merely as place markers using MERGEBARCODE fields in the body of the merge document will not work. To get around this issue, the process includes code which will create a bar code from a merge field, provided that the merge field is bounded by tags && and %% (see the User Information panel on the dialog below).
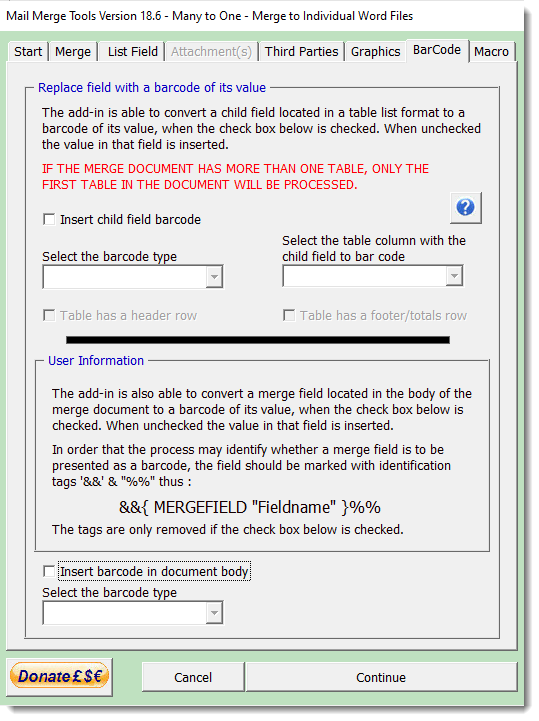

The process can convert a selected column (column 1 in the following illustration) to barcode type 39, 128 and QR in the following three fields respectively.

Merge to E-mail Message
The function is able to merge the document to the body of an e-mail message. This function, more than any other, took up a lot of development time to get to the stage it is currently at. There are several issues involved and thus this part of the process uses an entirely different means of communicating with message creation part of Outlook from the merge to attachment options with covering message.
IMPORTANT NOTE
When merging to the body of an e-mail message (and that will
include personalised covering messages with attachments) it is
essential that Outlook is started before Word. Otherwise the
merged documents will not be pasted to the message bodies. This
is a peculiarity of the link between Word and Outlook that I
have been unable to resolve. The process will therefore stop,
with a warning message if you attempt to merge to the body of an
e-mail message and Outlook is not already running.
If you start Word before Outlook and then run the merge, there
remains a possibility that the messages will again not contain
the message bodies and will result in an error condition. This
error is trapped. The process will stop and the user will see a
warning to close Word and Outlook and start again.
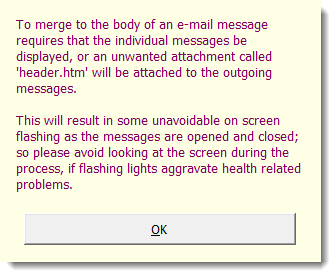
When Word is used as e-mail editor, as is the case when the documents are merged to the body of an e-mail message, and small attachment called 'header.htm' is attached to the message. This is a harmless addition which has been present since at least Word 2000, and there is no simple way around it.
Up to version 8.8 of the add-in, I allowed the add-in to produce these attachments, as this produced a cleaner running add-in, but it had not occurred to me that the attachments were also added when the merge was to attachments, with a customized message body. I have therefore modified the process to create the message bodies in a different way, but this has the disadvantage that each message must be opened and closed.
Such opening and closing produces flashing on screen as the messages are displayed briefly, and to date I have not found a way to avoid this, so when the Merge to Email Message option is selected (or the HTML check box is selected) the user will see a warning message. In addition I have removed the progress indicator for Merges to Message body (but not when the HTML check box is selected, as that is a much slower process and user indication is desirable).
A particular problem is that Word document format and formatted e-mail messages are quite different in their presentation and capabilities. E-mail does not, for example, support pages nor headers and footers, so if you are going to send the document as a message body, you must check its layout carefully in Word's Web view, and it would be advisable to create a dummy merge run with a limited record set to ensure that the results are what you expect.
If you want to be certain that the recipient will see the document as you intend, merging as an attachment - preferably in PDF format is the best way forward.
Dialogs for One to One and Many to One are shown below.
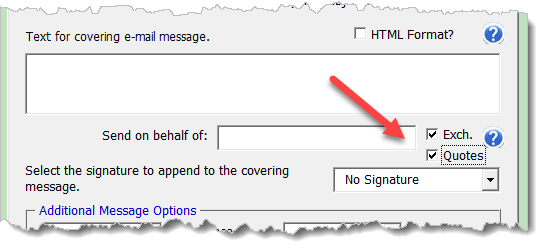
The add-in has been problematic for some users, when used with Exchange Server e-mail accounts in Outlook. This relates to the way the accounts are configured and a difficulty to send the messages created in the temporary folder. However the differences fall into two camps and I have therefore made the alternatives selectable via a 'Quotes' check box that is available on the userform when the Exchange Server option is selected. One or other setting of the 'Quotes' check box should suit most Exchange Server users.
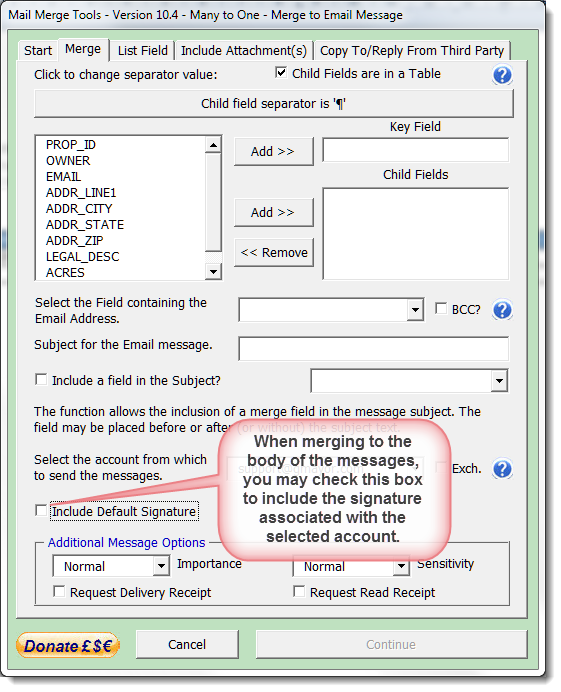
Note that both options enable more of the tabbed pages of the userform. Common to both are the 'Include Attachments' and the 'Copy to Third Party'. The Many to One option additionally includes the 'List Field' which was described in a previous section.
Invalid e-mail addresses
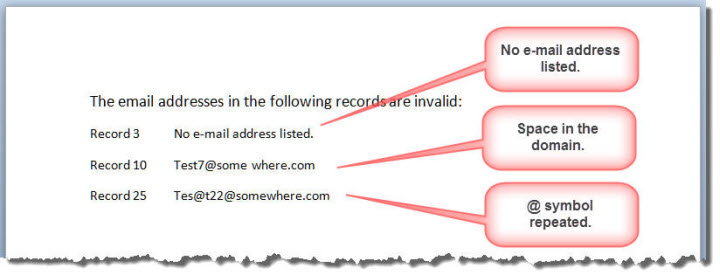
It is essential that the e-mail addresses in the data source are both present and valid when an option to merge to e-mail is selected. When such an option is selected, the add-in will examine all the e-mail addresses in the record set and if any addresses do not meet the required standards for e-mail address formats, the process will be stopped and you will see a warning message and the erroneous record numbers and associated e-mail addresses are listed in a new document to help you locate and correct them.
Note that it is the record number shown and not the row number in the Excel worksheet.
When attaching the Excel data source to the merge document, use the default OLE DB connection option and select the appropriate worksheet from the dialog. Use of alternative connections is likely to produce missing e-mail address errors.
This function caters for the vast majority of possible e-mail address configurations, however should you discover a genuine e-mail address reported as erroneous, or an erroneous address that is not flagged as incorrect then please e-mail me with the details so that I may modify the error trapping.
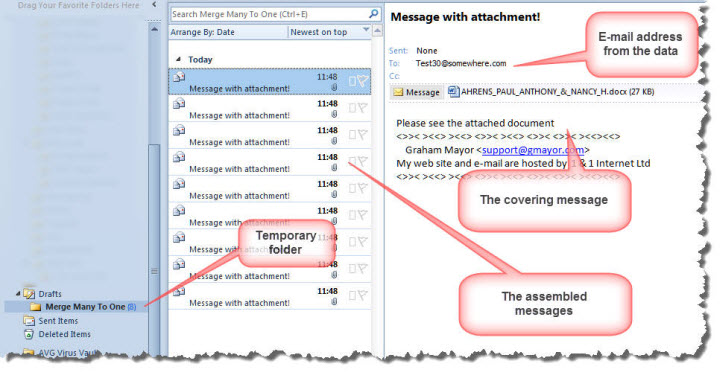
Outlook Temporary Folder
When 'Continue' is clicked, the messages are sent to a temporary sub folder of the Outlook drafts folder (to ensure a unique location) named Merge Many To One. If this folder is not present, it will be created.
One user had reported during the testing
cycle that the messages were created not in the temporary sub
folder, but in the Drafts folder itself. The process to send
messages will not handle the messages if they are in the Drafts
folder. If that occurs, manually drag the messages to the
correct folder before selecting the option to Send.
I would appreciate feedback from other any other user who
experiences this problem as so far I have been unable to
recreate it. In particular I would appreciate details of Outlook
account names and types.
A button on the ribbon provides a function to remove the temporary folder should you wish to do so. When removed the temporary folder is removed to the Deleted items folder.
The temporary folder allows the safe examination of the messages and attached documents produced, before committing to sending them. They will only be sent when the 'Send Messages' button is clicked.
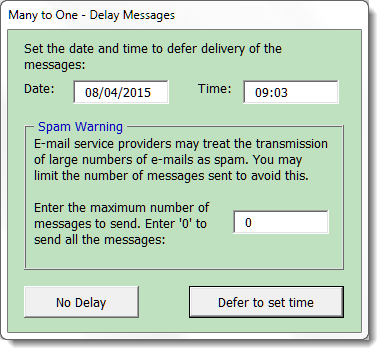
When the Send Messages button is clicked, the user is presented with a dialog in which to choose whether to defer sending the messages until a later time. By default the current time and date is displayed.
The dialog also allows for the sending of a subset of the messages in the temporary draft folder. This is only necessary when the e-mail service provider blocks large numbers of e-mail messages as part of a spam deterrent policy. If this is not required simply leave the setting at the default '0' value.
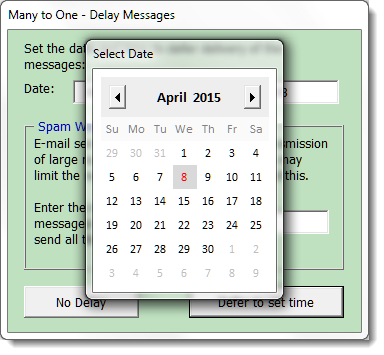
The dialog is error trapped against inappropriate entry and from version 10.1 features a date picker control that does not use the MSCOMCT2.OCX object library, that has proved problematical for uses with 64 bit operating systems. to provide a date picker function.
Thanks to Trevor Eyre for developing the Date Picker function. The Date Picker userform and associated code may be downloaded here, should you wish to use it in your own projects
Word 2010 changed the way e-mail accounts are filed, so each e-mail account can have its own inbox/outbox and, more to the point, Drafts folder. The add-in should detect and create the temporary folder in the Drafts folder relating to the default email account.
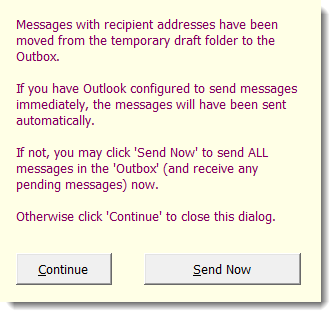
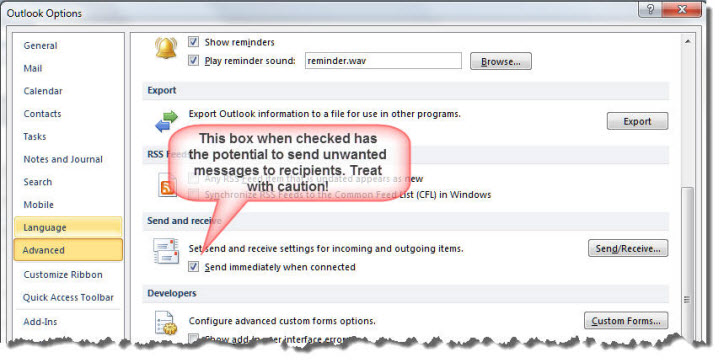
If you have Outlook configured to send messages immediately when connected (see below), and subject to the values configured in the Delay function, clicking the 'send messages' button, irretrievably sends the messages to their destination e-mail addresses.
If you have the option set not to send messages immediately when connected, then you have a further opportunity to change your mind, by clicking the 'Continue' button, which moves the messages to the Outbox.
If you choose the 'Continue' option, then you may use the Outlook Send and Receive function to send on the messages.
Messages that appear to be 'stuck' in the Outlook Outbox can often be sent by clicking the send button again and choosing the Send Now option.
No messages are ever sent directly from the temporary draft. Messages are only sent when you request they be sent.

At various times you may see one of a variety of error and information messages. I have not reproduced them here as they are self explanatory.
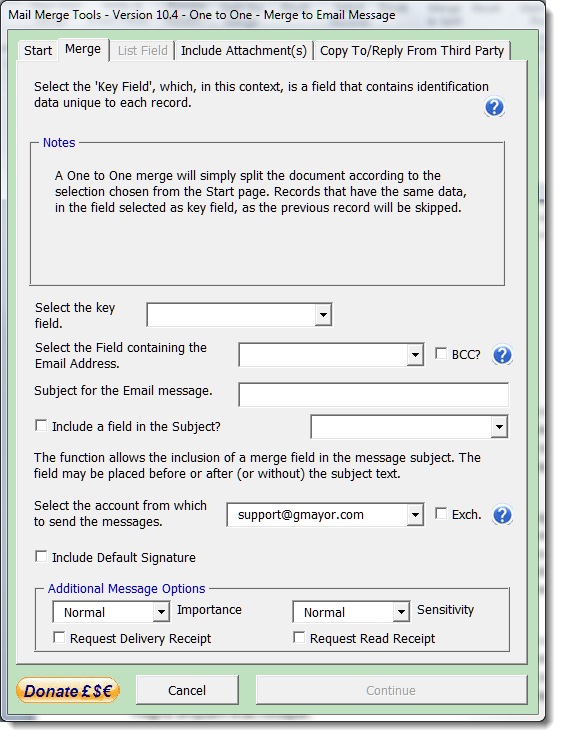
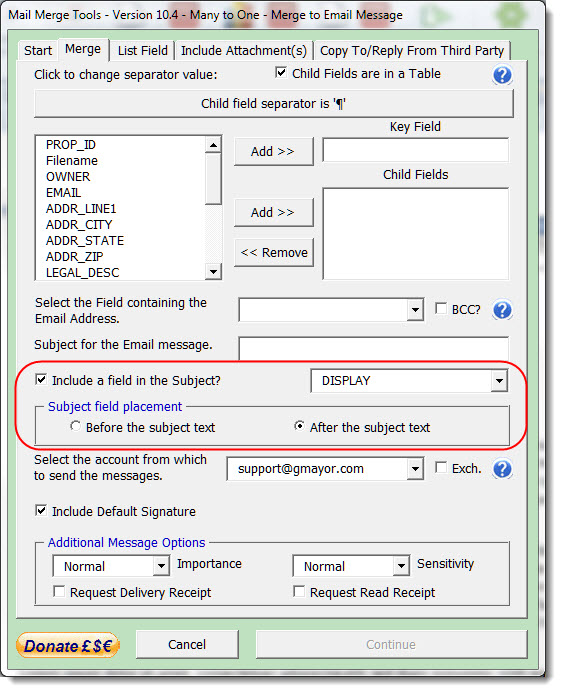
Message Subject
The message subject is entered into the userform, and there is an option to include the content of a field in the text. Note that the value used in the subject will be that from the key record. The field may be placed before or after the text in the subject text box.
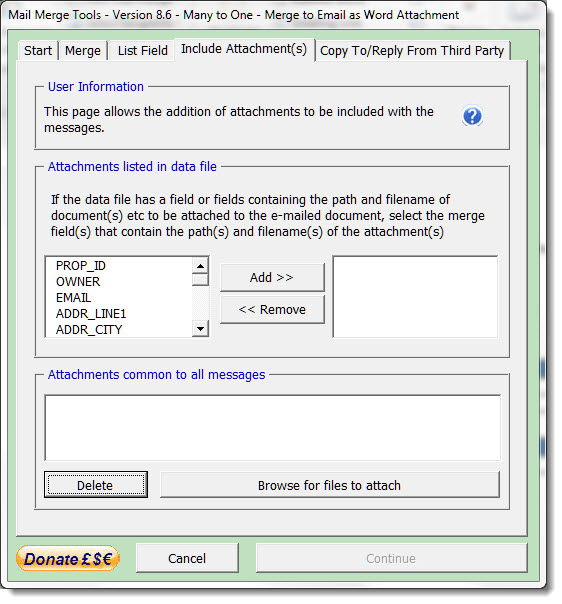
Include Attachments
Attachments may be included with the messages, and it was this provision that caused the most head scratching for documents merged to the message body. You may indicate the full path of the attachment in a field in the data file, which would allow separate attachments to each message, or you could browse to select a file to attach to all messages.
The Attachments dialog is similar for both One to One and Many to One selections.
Copy to Third Party
Users may wish to send the messages to a variety of recipients and the application allows for this. The e-mail field, selected on the Merge tabbed page, may contain multiple e-mail addresses separated by semi-colons.

The application will send the messages to each of the recipients entered into the e-mail field. If the BCC option is selected, all recipients will be directed to the 'BCC' box of the message header and thus be hidden from one another.
Users may also select a second e-mail field from the data source or enter an e-mail address manually. This last option can be useful when it is a requirement to send copies of messages to a co-worker, supervisor or head office.
Because the requirement to send a copy to a supervisor etc. is likely to be a persistent requirement, there is a check box on the Copy to Third Party page that when checked will store the text address for re-use. Unchecking the box will clear the data. Note that if you check this box, copies of all messages created by this function will be sent to that address.
Again the additional recipients may be hidden from one another and the main recipient(s), but if the main recipients are hidden and you choose the option not to hide the additional recipients, you will be prompted to confirm that choice.

Alternative Reply-To Address
All e-mail options allow the user to select an alternative reply-to address. This address may be retained for future use while the associated check box is checked.
Merge to E-mail as Attachment
The final option combines all the other functions already described and merges the document as an attachment to an e-mail message in either Adobe PDF or Word DOCX format. The covering message may be plain text entered from the userform or a formatted Word document.
Formatted Word Document as Message Body
Checking the HTML Format check box provides an option to select a Word document to use as message body.
The HTML Format option removes the option to select a message signature. If you need a signature block on your formatted covering message, then add it to the message document.
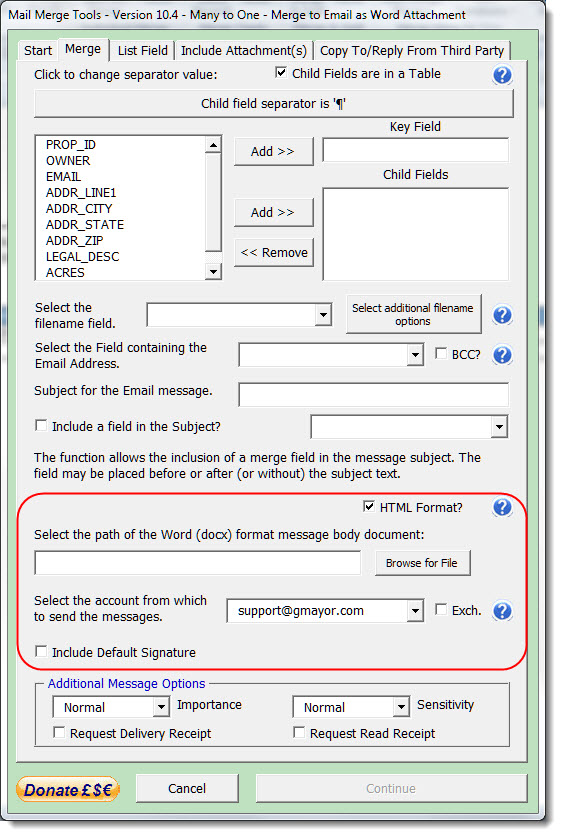
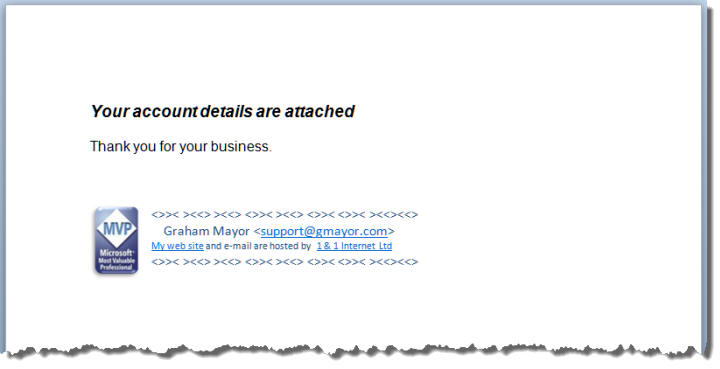
Create your covering message in Word, formatted as you wish it to appear (checking the appearance in Word's Web view) and save as 'docx' format. Enter the path to that document, which will be used as a template to create the covering documents. Inevitably this will slow the merge as that document is accessed for each record.
The results is as follows:
.jpg)
Do not save the covering message as a macro enabled document or template, or in the case of DOT format, do not include macros in the template.
Personalised formatted covering messages
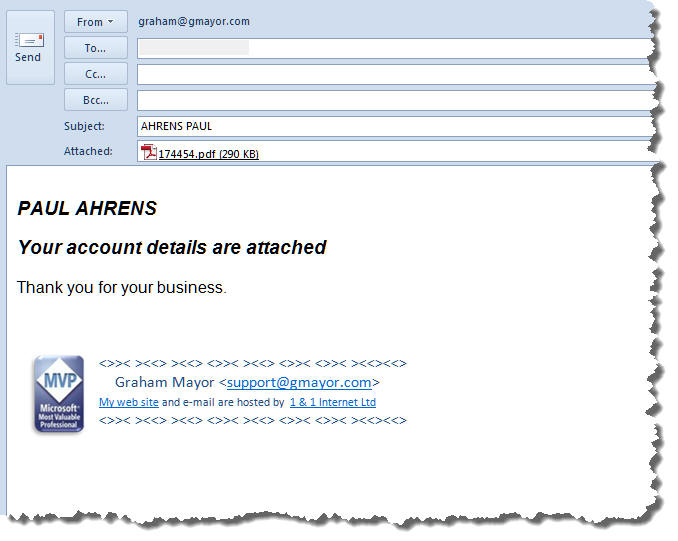
The document used as a covering message may also include form fields from the same datasource. This provides the opportunity to personalise the covering messages.
Create the covering message as shown above, and temporarily attach the same data source used for the attachments. Insert the fields that you wish to use e.g.:
.jpg)
Then set the document type to 'Normal Word Document (though the add-in will do this automatically if you forget).
When merged the data is read into the fields to produce personalised accompanying messages with the attachments as follows (this time with a PDF format attachment).:
A few important matters not previously mentioned.
The merge to e-mail message option is dependent upon the option to send the current document to an e-mail recipient being available in Word. If you find that this option does not produce any messages in the Outlook outbox, then the most probable reason is that this option is not available.
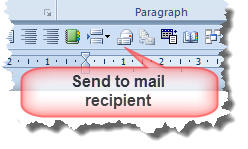
Its omission is caused by a MAPI error. Repairing Office from the Windows Control Panel add or remove programs applet should fix it. Ensuring Outlook is the default e-mail application in Windows should also fix it, but doesn't always. This is not the fault of the add-in, but of the host application. As a quick check, add the Send To Mail Recipient command from the All Commands section to the Quick Access Toolbar. If there is a problem, the command will be grayed out. This issue does not affect the alternative merge options provided.
Field Errors
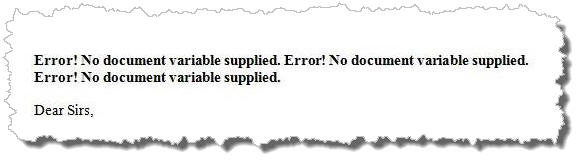
When using the add-in it is possible that you will encounter the error message shown in the next illustration in your document attachments.
The error occurs because the merge fields in the document are replaced with docvariable fields. However, because of the way mail merge ignores certain characters that may be used in the data source field names, the values that end up in the document variables may not match the variable names in the docvariable fields.
There is no documentation, that I have been able to find, that discusses how Word mail merge handles field names, and, worse still, when there are several similar field names, the mail merge renames the fields to avoid conflicts. I have trapped all those unwanted characters that may reasonably found in a field name, but I cannot do anything about your field naming with similar field names.
If you see such an error in any of your merge documents, check out the field names, before reporting the issue to me. Toggle the display of fields to display the errant field construction, so that you may cross reference it with the corresponding field in the data source. The character that is different in the Excel data source from the Word field is the one that needs to be fixed to make it work correctly. Ensure especially that there are no leading spaces in your column headings
If you are unable to edit the data source for whatever reason, and this issue is thus insurmountable, let me know the character in question and I will add it to the list of corrections. I do not anticipate that this will occur very often.
You may encounter the following error message when you select Start Merge from the ribbon.
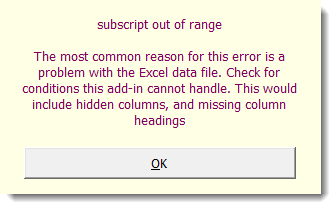
The add-in addresses the Excel data directly. It is not a conventional mail merge. Consequently if the macro cannot access the data it requires, the error message is created.
This error will occur in circumstances that a conventional merge would handle. In particular if you have hidden columns in your worksheet, or you have hard to spot spaces in columns that are not used for the process, you will get phantom field names, which the add-in will not be able to resolve. If you see this error message, the first thing to check is for such phantom fields.
If the issue relates to phantom fields, this issue may be corrected from version 7.4, by clicking the Clean Worksheet button in the Misc Functions menu.
.jpg)
PDF Creator
The add-in includes options to create the PDF files using the Open Source PDFCreator. Where the PDFCreator driver is present, the PDFCreator options will be enabled in the add-in.
PDF Creator is only required if you wish to create protected PDF files. Most users will probably not require this functionality.
The process has been configured to use
the version 2.5.2 of
PDF Creator. It will no
longer work with the earlier version 1.7.3.
Note that this also includes PDF
Architect, which is not required, and unless you want this
application, I would recommend that you use the 'Expert'
installation settings and uncheck PDF Architect.
Do not accept the offer to update to
the latest version.
Note also that
the free version installer will offer assorted plug-ins for your browser,
that are certainly not required. Make sure you de-select these
during the installation.
Ensure that you disable updating of this version in the program
setup. There are later versions of PDF Creator, but Many to One
has not been tested using those versions.
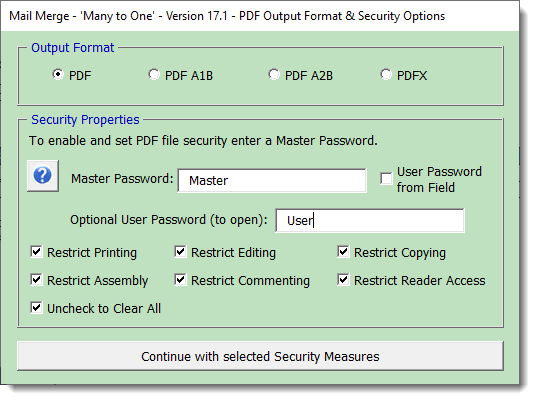
When merging to PDF format with PDFCreator the add-in additionally provides the option to engage PDF security measures. When the 'Continue' button on the main dialog is clicked, a second userform will open to offer that facility. Clicking 'Cancel' on this userform will cancel the whole process.
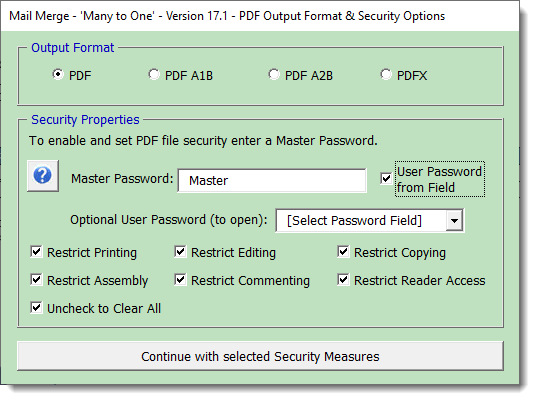
The items shown disabled in the following illustration become available when a Master Password is entered. If you don't want additional security measures then don't set a Master Password!
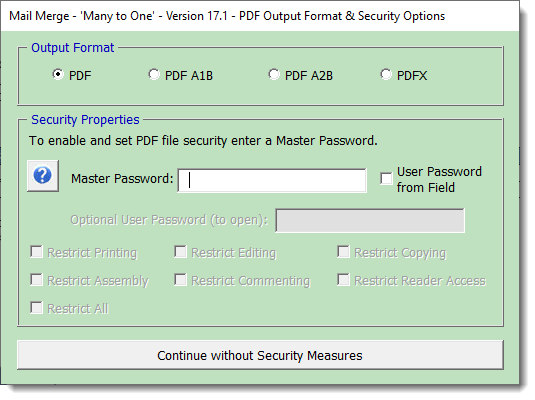
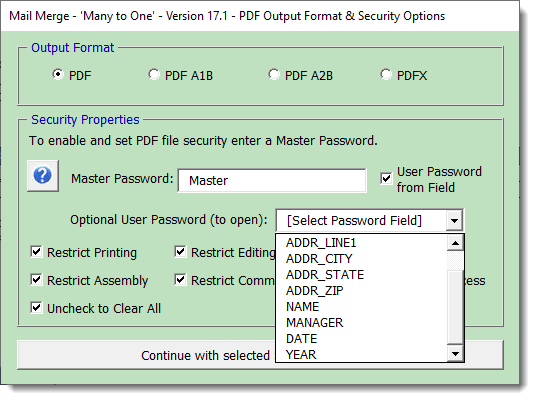
The additional options become available when there is text in the Master password text box. This includes the provision to add a common password to open the PDFs or to use a password for each document from a field in the merge data source, dependent on the setting of the 'User Password from Field' check box
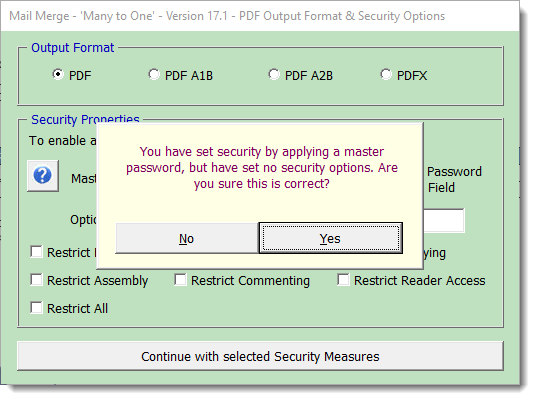
If you continue without setting options, you will see the following dialog. Click 'No' to set options or 'Yes' to continue without.
Currently the additional security options are only supported when the option PDF is checked. Should you check one of the other PDF format types, the dialog changes as shown below and any security settings entered are returned to their default values.

The PDF files are created in the same folder as the documents.
 - Click here to view a short video of the
basic process
- Click here to view a short video of the
basic process
This YouTube video is recorded at 1080P HD, so if it looks blurred on your screen, change your YouTube view settings to HD.
From Version 17.0, the add-in retains all
your choices about the current merge. Provided the merge
document and the data are again the same, the next time you run
the merge the same settings are presented.
If you click the Cancel button, all the settings related to the
merge are eliminated from the registry. Only the configuration
settings are then retained.
 -
Click here to download the Many to One add-in
-
Click here to download the Many to One add-in
If you experience problems with this add-in,
then please read this page - especially the yellow panels - to see
if your problem is addressed, before reporting it.
The add-in (from version 14.7) is compatible with the 64 bit
versions of Office including Office 365
DO NOT use the add-in template as a document template for creating merge documents!
Merge Tools
Some time ago I developed a pair of add-ins, based on an idea by fellow Word MVP Doug Robbins, to enable mail merges to email with attachments and to perform 'many to one' merges.
Over the period these add-ins have been available I have had regular feedback from users, suggesting enhancements, reporting bugs and pointing out and limitations.
As the projects became more complex, I found that a lot of the material was being duplicated, so I decided to take the plunge and redeveloped the add-in from the ground up, to combine the two processes and to incorporate as many of the suggestions for improvement as possible. This page demonstrates the fruit of the many hours of work it took to complete and test the project.