Graham Mayor
... helping to ease the lives of Microsoft Word users.
 |
 |
 |
Many people access the material from this web site daily. Most just take what they want and run. That's OK, provided they are not selling on the material as their own; however if your productivity gains from the material you have used, a donation from the money you have saved would help to ensure the continued availability of this resource. Click the appropriate button above to access PayPal.
Formatting Word fields with switches
Word provides the means to format the contents of fields inserted into the document, by the use of 'switches' or masks. The full range of these switches can be found at the end of this page.
The following tips are intended to cover some of the less obvious issues.
Where field combinations are inserted manually, the field boundaries { } are inserted with CTRL+F9 and not typed directly from the keyboard.
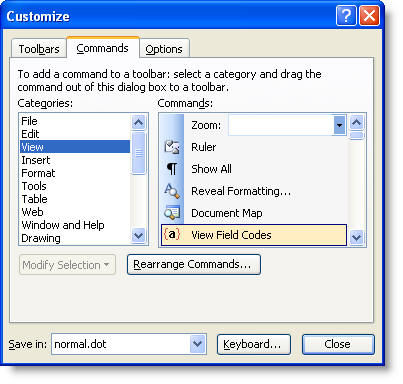
To edit the field switches, toggle between the field display and the result with ALT+F9 or use Tools > Customize to add a View Field Codes toolbar button to toggle the display.
Select the item from the list and drag it to a toolbar:
The F9 key will update the field content to reflect the changes, or you could use macro code to update all the fields in the document.
Microsoft changed the way office programs are connected for the purposes of mail merging with Office 2002 and this change was maintained in Office 2003/2007/2010. Word is now expected to provide the formatting. It is still possible to revert to the old way of doing things. To this end, see the Excel Data section of ' Mail Merge to Labels with Office XP'. Number fields (For negative numbers in calculations, see the separate entry.)
Word's formatting switches can handle numbers up to 14 digits after which it rounds off the numbers. This can cause problems when serial numbers contain more than 14 digits and the last digits are rather important!
Take the example of the number 3456 7123 0987 7652, assembled as four blocks of four digits, as used for example for credit and debit cards. In the data file this may be stored as a single number 3456712309877652.
Inserting the Mergefield
will produce:
Logic, and Word's help on the subject, suggests the addition of a numeric switch thus:

will produce the required result, but in fact what happens is that the number is rounded to 14 digits thus:

The answer should be to split up the field into two parts with the aid of the SET field to assign parts of the data to bookmarks, then to display the bookmarks with the switches.

The result the is:
which is nearer but still not right.
When there is a zero as the penultimate number in the sequence, thanks to a bug in Microsoft's mathematics, the last number is rounded down to zero also:
which again of course is not much help..
It requires some brute force to overcome these errors, and the resulting construction is never going to look elegant. But the following does work.
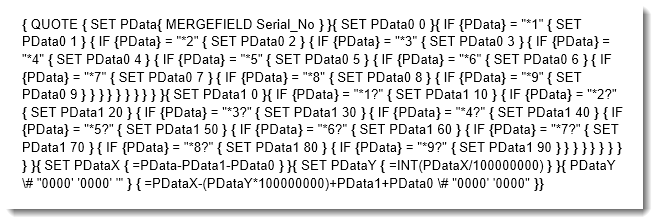

Because of the likelihood of getting hopelessly lost when transcribing the above construction into actual fields, I have also copied and pasted the construction as text, below, which can be pasted into your document and then converted to working fields with my Export Fields add-in.
{ QUOTE { SET PData{ MERGEFIELD Serial_No } }{ SET PData0 0 }{ IF {PData} = "*1" { SET PData0 1 } { IF {PData} = "*2" { SET PData0 2 } { IF {PData} = "*3" { SET PData0 3 } { IF {PData} = "*4" { SET PData0 4 } { IF {PData} = "*5" { SET PData0 5 } { IF {PData} = "*6" { SET PData0 6 } { IF {PData} = "*7" { SET PData0 7 } { IF {PData} = "*8" { SET PData0 8 } { IF {PData} = "*9" { SET PData0 9 } } } } } } } } } }{ SET PData1 0 }{ IF {PData} = "*1?" { SET PData1 10 } { IF {PData} = "*2?" { SET PData1 20 } { IF {PData} = "*3?" { SET PData1 30 } { IF {PData} = "*4?" { SET PData1 40 } { IF {PData} = "*5?" { SET PData1 50 } { IF {PData} = "*6?" { SET PData1 60 } { IF {PData} = "*7?" { SET PData1 70 } { IF {PData} = "*8?" { SET PData1 80 } { IF {PData} = "*9?" { SET PData1 90 } } } } } } } } } }{ SET PDataX { =PData-PData1-PData0 } }{ SET PDataY { =INT(PDataX/100000000) } }{ PDataY \# "0000' '0000' '" } { =PDataX-(PDataY*100000000)+PData1+PData0 \# "0000' '0000" }}
Thanks to MVP Peter Jamieson for suggesting the above solution.
Insert field information and associated text conditionally
Sometimes when merging data you may need to include additional text only when the associated field has content, or you may wish to insert a particular field without leaving a space when there is no content in that field. The simplest method is to use a conditional field or fields to place the data and associated text.
In the following example using data from an Outlook contacts list, I have prepared a simple Directory (Catalog) merge which includes various fields and associated text depending on whether the fields have content.
With the three records used for the illustration, one of the conditionally included fields and text does not appear. In the first of the three illustrations, note the positions of the quote marks "" which set the limits of what is printed.
For the sake of clarification, for the second illustration I have switched on the display of formatting marks (CTRL+* or click the ¶ button on the toolbar).
In the third of the pictures is the result of the merge
Conditionally Insert a graphical image
Where images are included as part of a conditional (IF) field construction, the IncludePicture field does not work as anticipated. The results of the conditional field are hard coded into the merge, which does not provide the opportunity to update, following a merge to a new document. (See also Mail Merge Graphics).
Thus conventional wisdom would suggest that:

should insert the picture identified from the mergefield 'Fieldname' and nothing when the field is empty. Unfortunately this is not the case.
The following workaround demonstrates the insertion of a blank image where the condition is not met (save e.g. a 1 pixel transparent image as Blank.jpg to give the effect of nothing being inserted - or download such an image by clicking the link). Note that INCLUDEPICTURE is the primary field and the condition is achieved as part of its content rather than the other way around.

You can insert the required picture into the result of the conditional field directly and that will work also. e.g. to add an airmail image to envelopes intended for other countries, you could use the following:
which will insert the airmail image when the country field is other than Cyprus (where I live).
Conditionally insert a Styleref Field in a header/footer
Styleref fields are used to display the content of a nominated paragraph or character style - and are most frequently found in page header or footer.

If the nominated style does not exist, then the following error message is displayed:

This is not very helpful when building a template that may not have this particular style. It is, however possible to conditionally search for the error message in the field result and only insert the Styleref field when the error message is not present. You can use a wildcard in the search pattern as shown.
This produces the required content when the style is present ......
..... but nothing when it isn't

Insert quotation marks in a conditional merge field result
Peter Jamieson also came up with the following approach to the problem of inserting quotation marks "" in the result of a conditional mail merge.
In a recent newsgroup question the questioner wanted to insert Exhibit "A" when a certain field was empty.
The logical code for this would appear to be

but this chops off the text at the first quote mark:

You may then consider 'escaping' the quote mark with a '\' e.g.:

but unfortunately Word inserts the quotes but also the slash

One solution is to set the quote and the slash as a bookmark using a SET field and then insert the bookmarks using REF fields (the REF part is optional) thus:

An alternative approach is to use a pair of Quote fields to place the quotes characters directly e.g.

either of which produces the desired result:

Testing for a value in one of several fields.
Sometimes when preparing a mail merge document, you may wish to insert text based upon whether a value has been inserted in one of a number of fields.
The following example tests for whether Field1 contains "A", or Field2 contains "B", or Field3 contains "C". If any or all of those fields meet the condition, "True" is entered in the merge document. If not, "False" is entered. In a real merge situation True or False can be replaced by whatever you wish.
You could test for any content using this method, which uses a collection of conditional fields that insert a value of 1 or 0 into a calculation according to whether the value required is contained in the field. The results are added together. If the result of that calculation is 1 or more, then one of more of those fields contains the required data. Thus:

The following shows the content of the three fields and the result of the merge calculation.
Convert upper case data to lower case with the first word capitalized.
The \*FirstCap switch is normally used to format fields to lower case with the first word capitalized as in a normal sentence. However with some upper case data sources , the switch doesn't appear to do anything. The solution here is to convert the field to lower case first, by using a \*Lower switch, thus:

The \*Lower switch is also useful when used in conjunction with data - e.g. user forms where the content may be entered in upper or lower case, but you wish to test for the entered content. Let's take the example of a bookmark from a user form which requires YES to be entered in the document when the content of the bookmark is 'yes' or 'YES' or 'Yes'. In this case add the \*Lower switch to the REF field and test for y followed by any other characters.

Format cash amounts to 2 decimal places
Sometimes when merging data, comprising cash amounts, especially when importing from Excel, the mergefield displays up to 14 decimal places. This is caused by the way Excel handles numeric data internally, but is easily tamed by the addition of a switch to limit the data to 2 decimal places. e.g.

are produced by the following 2 fields respectively

In the second field, the switch \# "$,0.00;($,0.00)" includes a comma, which provides for the commas to indicate thousands and millions e.g.
and an optional currency symbol - here a dollar sign.The numeric mask can also be expressed as "$,#.00;($,#.00)" where the '#' will suppress the 0 for amounts less than a dollar.
One variation I used to use a lot is for Cyprus Pound currency amounts (Cyprus has since adopted the Euro currency):

The section after the semi colon dictates what to do with negative amounts - here they are bracketed and coloured red. The semi-colon and following section are optional.
Format cash amounts to 0 decimal places
Sometimes with decimal amounts, when the amount to the right of the decimal is zero, you may wish to show a whole number, without the decimal, whilst retaining the amount to the right of the decimal where the amount is greater than zero e.g. $12.00, should display as $12, but $12.95 should retain its decimal amount. This cannot be achieved with a simple switch and therefore you need to insert a conditional field to display one or the other according to what comes after the decimal. In the following example I have suppressed the display of zero amounts (see section below).

Formatting cash amounts in words
Word provides special switches - *cardtext and *dollartext (detailed in the table at the end of this page) but these are somewhat limiting if you want to express amounts in words. It is, however, possible to derive amounts in words using conditional, and formula fields with the *cardtext switch.
The following example takes the decimal output from a form field, using the default form field bookmark name Text1. The fields can be easily adapted to use mergefields and any decimal currency.
Where Text1 contains the amount 1.00 - the fields produce one dollar
Where Text1 contains the whole number 2.00 (or greater) the fields produce two (or more) dollars
Where Text1 contains .01 the fields produce one cent
Where Text1 contains .50 the fields produce fifty cents
Where Text1 contains 5.75 the fields produce five dollars and seventy-five cents
etc
The method has problems with numbers over 1 million, so as a workaround, you could use something along the lines of
Percentages
Frequently, percentages will display as decimals - e.g. 41% from the data may display as 0.41354836739 when merged into Word. To display the decimal as a percentage, you should create a calculated field e.g.:


Suppress field display for numbers <=0
You may wish to suppress the field result altogether, when the numeric content is 0 or a negative number. This can be achieved with a conditional field, or more simply with a variation on the above numeric switch e.g. \#"$,0.00;;"
Any positive number will display in a dollar format (the dollar sign being optional again). Zero or negative numbers will display nothing.
The two semi colons at the end determine what happens with negative numbers and zeros. To understand the principle consider
\# "$,0.00;negative;zero"
In other words for a number greater than zero the result is formatted as $,0.00
For numbers less than zero - the number is formatted as negative - in this case "negative" will be entered
For a result of zero - the number is formatted as zero - and again in this example will be entered as "zero"
Lets say you have a data file with a single field called 'Number', which contains the following records:
-1
0
1
Merging that field - {Mergefield Number \# "$,0.00;negative;zero"} will result in:
negative
zero
$1.00
Calculated Form Fields - suppress zero
The currency switches available in a calculated form field are limited, but you can suppress the zero in a calculated form field, by adding a switch to the calculation part of the field. Toggle the display (ALT+F9) to display:

Then add the switch.

Alternatively abandon the calculated form field and use instead a Word formula field thus:

Then toggle back or lock the form to display the results, which would be the same in either case.


US Zip Codes
Five digit zip codes are reported as dropping the leading zero when merging from Excel/Access data files. A simple numeric switch should fix that one

Formatting problem: the zip codes in my data source are 5-digit or 9-digit. What I'd like to do is apply a number format that will convert all ZIP codes to ZIP + four format, i.e. 12345 becomes 12345-0000, 123450000 becomes 12345-0000 and 123456789 becomes 12345-6789
This requires the use of a conditional field which tests whether the field has five or nine digits then applies appropriate formats.


If you wish to display the 5 digit zips without the '-0000' suffix used in the above example, and show nothing when the field is empty then modify the formatting switch thus:

0r

Calculations cannot be performed on text, so in order for the above to be of use, the data should be entered as a continuous number of 5 or 9 digits. 9 digit numbers can be formatted using Excel's cell formatting as a 5+4 Zip, which will provide the hyphen in the Excel display whilst retaining the number as the raw data.
Telephone Numbers
Formatting problem: the telephone codes in my data source are formatted as (000)000-0000 but when merged display as 0000000000. This requires a simple numeric/text format switch:

Note the single quotes around the hyphen.
Mail Merge and Date Fields
When creating a merge document that will contain a DATE field that is to be merged to a new document (or documents) as opposed to printed material, ensuring the the date in the merged document remains the date on which the merge took place can be problematical. DATE fields are preserved across a merge, thus when the document is opened at a later date, it will display the system date from the PC rather than the date the merge took place.
If you insert a CREATEDATE field then that will always display the date the document was created, and is not preserved during the merge, but is converted to text. While this is fine if you merge on the date the merge document with the field was created, you may wish to re-use the merge document, and display the new merge date. CREATEDATE cannot do that (unless you use SAVEAS to save the merge document with the same name).
There are several ways to work around this problem e.g.
when merged these result as:
All but the date field are converted to text and thus retain the date of the merge.
Testing for events that occur before or after a certain date
When running a mail merge, you may want to test for events that happen before or after a certain date. Mail merge does not convert dates to numbers, so if you cannot automatically derive a date number from the date in the data file, as you could in (say) Excel, a different plan is called for.
Let's say the date comes into Word in the format d/MM/yyyy or 1/10/2002 (1st October 2002) from a MERGEFIELD called Start_Date. In this example, we are looking to identify records with Start_Date entries before 1st October 2002.

The above would appear the logical check, but the check treats the date as a number and identifies that number as 1, which is the first part of the number before the slash '/'. All dates other than the first of the month will be greater than 1, so all will produce the result "False".
We therefore need to display the date in numbers that represent the date in a unique way by using the date mask yyyyMMdd which displays the date as a series of digits for year month and finally day, without any breaks. This is a number that the conditional field will view as a whole.

Thus any date before 1/10/2002 would produce "True" and any other date would produce "False"
Testing for fields that may contain numbers/date or text
While it would be better to ensure that the data file has separate fields for numbers and text, sometimes you have to work with what you get. In a Word forum question a user wanted to test a field that contained dates or text and reproduce only those fields that contained dates. The solution relies on the fact that if you perform a calculation on a field containing text, an error message is produced e.g.:

This can be trapped in a conditional field structure by comparing the result of the field with the error message thus:

produces

if the field contains a date, or

If the field contains text.
There is no need to test against the complete error message, as the condition will accept wildcards. Thus you can search for the leading exclamation mark and the wildcard character '*' as shown.
Date fields with ordinals
UK dates are often displayed using a superscripted ordinal such as 23rd November 2002. This is simple enough to produce if the date is typed from the keyboard, but is difficult to produce automatically with fields (though there is a possible solution suggested in fellow MVP Paul Edstein's impressive study of date fields which you can download from this site in DateCalc.zip) as shown below:-

which produces:-

Without such complexity, Word can readily manage 23rd November 2002 i.e. without the superscript, as the superscript is usually applied by Word's autoformat function, which does not affect insertions by field.
The required format can be achieved by converting the field to text and then applying the auto-formatting to the result.
For a document template start with a combination of fields:

Select both fields and save to a bookmark - call it Date
The following macro will run automatically when a new document is opened, which will convert the fields to text and autoformat to add the superscript.
Dim oRng As Range
Set oRng = ActiveDocument.Bookmarks("Date").Range
With oRng
.Fields.Unlink
.End = .Words.First.End - 1
.Start = .End - 2
.Font.Superscript = True
End With
End Sub
The macro MUST be saved in the relevant document template and not in the Normal template.
While the above is ideal where the date field is pre-inserted into a document template, where you simply wish to insert a similarly formatted current date into an existing document then with a small variation the same principle can be applied. Here the date fields a re saved to an autotext entry - this time save in the normal template to enable such dates to be available to all documents. Call the autotext entry Date. The following macro inserts the autotext and then converts to text and formats the result.
Dim oRng As Range
Dim oFld As Field
Set oRng = Selection.Range
NormalTemplate.AutoTextEntries("Date").Insert Where:=oRng
With oRng
.Fields.Unlink
.End = .Words.First.End - 1
.Start = .End - 2
.Font.Superscript = True
End With
End Sub
Changing minutes to hours and minutes
In a database used for mail merge, you may have a field called (e.g) MINUTES that contains a time in minutes e.g. 165 minutes, that you want to display in hours and minutes. Normal date/time switches will not help here, so you need to resort to mathematics to produce the required result

alternatively

either of which will produce

In both examples the use of the formatting switches indicated below will remove any text following the number, thus is the field MINUTES actually contains 165 minutes, the content of the field is treated as 165.

The basic switch information - reproduced and edited from Word Help
The following information extracted and edited from Word's own help files completes the picture relating to the use of formatting switches.
Format (\*) fieldswitch
The following is a list of switches and items that they capitalize:
Number formats
The following is a list of number switches and their results:
| \*alphabetic | Displays results as alphabetic characters. The
result has the same case as the word "alphabetic" in the
switch.
For example, { SEQ appendix \* ALPHABETIC } displays "B" (instead of "2"), and { SEQ appendix \* alphabetic } displays "b". |
| \*Arabic |
Displays
results as Arabic cardinal numerals. For example, { PAGE \* Arabic } displays "31". Note: If the Number format setting in the Page Number Format dialog box (Page Numbers command, Insert menu) is not Arabic, this switch overrides the Number format setting. |
| \*CardText | Displays results as cardinal text. The result is
formatted in lowercase letters unless you add a format
switch to specify a different capitalization.
For example, { = SUM(A1:B2) \* CardText } displays "seven hundred ninety", and { = SUM(A1:B2) \* CardText \* Caps } displays "Seven Hundred Ninety". |
| \*DollarText | Displays results as cardinal text. Microsoft Word
inserts "and" at the decimal place and displays the
first two decimals (rounded) as Arabic numerators over
100. The result is formatted in lowercase letters unless
you add a format switch to specify a different
capitalization.
For example, { = 9.20 + 5.35 \* DollarText \* Upper } displays "FOURTEEN AND 55/100". |
| \*Hex | Displays results as hexadecimal numbers. For example, { QUOTE "458" \* Hex } displays "1CA". |
| \*OrdText | Displays results as ordinal text. The result is
formatted in lowercase letters unless you add a format
switch to specify a different capitalization.
For example, { DATE \@ "d" \* OrdText } displays "twenty-first", and { DATE \@ "d" \* OrdText \* FirstCap } displays "Twenty-first". |
| \*Ordinal | Displays results as ordinal Arabic numerals. For
example, { DATE \@ "d" \* Ordinal } displays "30th". Note: See the section above relating to the insertion of superscripted ordinals |
| \*roman | Displays results as Roman numerals. The result has the same case as the word "roman" in the field code. For example, { SEQ CHAPTER \* roman } displays "xi", and { SEQ CHAPTER \* ROMAN } displays "XI". |
Character formats and protecting previously applied formats
The following are character formatting switches and their results:
| \*CHARFORMAT |
Applies the formatting of the first letter of the field to the
entire result. The result of the following example has
bold formatting because the "R" in "REF" is bold. { REF chapter2_title \* CHARFORMAT } displays "Whales of the Pacific". You can of course use this to ensure that the formatting retains the formatting of the line that the field is inserted into. Thus { REF chapter2_title \* CHARFORMAT } would display "Whales of the Pacific" |
| \*MERGEFORMAT |
Applies the formatting of the previous result to the new result.
For example, if you select the name displayed by the
field { AUTHOR \* MERGEFORMAT } and apply bold
formatting, Microsoft Word retains the bold formatting
when the field is updated when the author name changes.
Note: For some odd reason known only to Microsoft, when you insert fields by using the Field dialog box (Insert menu, Field command), the \*MERGEFORMAT switch is included by default. You can turn this option off on an individual basis by clearing the Preserve formatting during updates check box in the Field dialog box. |
Numeric Picture (\#) field switch
Specifies the display of a numeric result.
For example, the switch \# $,0.00 in { = SUM(ABOVE) \# $,0.00 } displays a result such as "$4,455.70." If the result of a field is not a number, this switch has no effect.
Quotation marks are not required around simple numeric pictures that do not include spaces— for example, { MarchSales \# $,0.00 }. For more complex numeric pictures and those that include text or spaces, enclose the numeric picture in quotation marks, as shown in the following picture item examples. Microsoft Word adds quotation marks to numeric picture switches if you insert a field by using the Field command (Insert menu) or the Formula command (Table menu).
Combine the following picture items to build a numeric picture switch.
| 0 (zero) | Specifies the requisite numeric places to display in the result. If the result does not include a digit in that place, Word displays a 0 (zero). For example, { = 4 + 5 \# 00.00 } displays "09.00". |
| # | Specifies the requisite numeric places to display in the result. If the result does not include a digit in that place, Word displays a space. For example, { = 9 + 6 \# $### } displays "$ 15". |
| x | Drops digits to the left of the "x" placeholder. If
the placeholder is to the right of the decimal point,
Word rounds the result to that place. For example: { = 111053 + 111439 \# x## } displays "492". { = 1/8 \# 0.00x } displays "0.125". { = 3/4 \# .x } displays ".8". |
| . (decimal point) | Determines the decimal point position. For example,
{ = SUM(ABOVE) \# $,0.00 } displays "$495.47". Note: Use the decimal symbol specified as part of the regional settings in Microsoft Windows Control Panel. |
| , (digit grouping symbol) | Separates a series of three digits. For example, { = NetProfit \# $#,###,### } displays "$2,456,800". This can be written more simply as { = NetProfit \# $,0 } Note: Use the digit grouping symbol specified as part of the regional settings in Windows Control Panel. |
| - (minus sign) | Adds a minus sign to a negative result, or adds a
space if the result is positive or 0 (zero). For
example, { = 10 - 90 \# -0 } displays "-80" and { = 10 + 90 \# -0 } displays " 190". |
| + (plus sign) | Adds a plus sign to a positive result, a minus sign
to a negative result, or a space if the result is 0
(zero). For example, { = 100 - 90 \# +0 } displays "+10" and { = 90 - 100 \# +0 } displays "-10". |
| %, $, *, and so on | Includes the specified character in the result. For
example, { = netprofit \# "##%" } displays "33%". |
| "positive; negative" | Specifies different number formats for positive and
negative results. For example, if the bookmark Sales95
is a positive value, the field { Sales95 \# "$,0.00;-$, 0.00" } displays the value with regular formatting— for example, "$1,245.65". A negative value is displayed with bold formatting and a minus sign— for example, "-$ 345.56". |
| "positive; negative; zero" | Specifies different number formats for a positive result, a negative result, and a 0 (zero) result. For example, depending on the value of the Sales95 bookmark, { Sales95 \# "$,0.00;($, 0.00);$0" } displays positive, negative, and 0 (zero) values as follows: $1,245.65, ($ 345.56), $0 |
| 'text' | Adds text to the result. Enclose the text in single
quotation marks. For example, { = { Price } *8.1% \# "$,0.00 'is sales tax' " } displays "$347.44 is sales tax". |
| 'numbereditem' | Displays the number of the preceding item that you
numbered by using the Caption command (Insert menu,
Reference submenu) or by inserting a SEQ field. Enclose
the item identifier, such as "table" or "figure," in
grave accents (`). The sequential number is displayed in
Arabic numerals. For example, { = SUM(A1:D4) \# ",0.00 'is the total of Table' `table`" } displays "456.34 is the total of Table 2". |
Date-Time Picture (\@) field switch
Specifies the display of a date or time.
For example, the switch \@ "dddd, MMMM d, yyyy" in the field
{ DATE \@ "dddd, MMMM d, yyyy" } displays "Friday, November 24,
2002." Combine the following date and time instructions— day
(d), month (M), and year (y); hours (h) and minutes (m)— to
build a date-time picture. You can also include text,
punctuation, and spaces.
Date instructions |
||
| Month (M) | The letter "M" must be uppercase to distinguish months from minutes. | |
| M | Displays the month as a number without a leading 0 (zero) for single-digit months. For example, February is "2". | |
| MM | Displays the month as a number with a leading 0 (zero) for single-digit months. For example, February is "02". | |
| MMM | Displays the month as a three-letter abbreviation. For example, February is "Feb". | |
| MMMM | Displays the month as its full name. e.g. February | |
| Day (d) | Displays the day of the month or the day of the week. The letter "d" can be either uppercase or lowercase. | |
| d | Displays the day of the week or month as a number without a leading 0 (zero) for single-digit days. For example, the sixth day of the month is displayed as "6". | |
| dd | Displays the day of the week or month as a number with a leading 0 (zero) for single-digit days. For example, the sixth day of the month is displayed as "06". | |
| ddd | Displays the day of the week or month as a three-letter abbreviation. For example, Tuesday is displayed as "Tue". | |
| dddd | Displays the day of the week as its full name. | |
| Year (y) | Displays the year as two or four digits. The letter "y" can be either uppercase or lowercase. | |
| yy | Displays the year as two digits with a leading 0 (zero) for years 01 through 09. For example, 1999 is displayed as "99", and 2006 is displayed as "06". | |
| yyyy | Displays the year as four digits. | |
Time instructions |
||
| Hours (h) | A lowercase "h" bases time on the 12-hour clock. An uppercase "H" bases time on the 24-hour, or military, clock; for example, 5 P.M. is displayed as "17". | |
| h or H | Displays the hour without a leading 0 (zero) for single-digit hours. For example, the hour of 9 A.M. is displayed as "9". | |
| hh or HH | Displays the hour with a leading 0 (zero) for single-digit hours. For example, the hour of 9 A.M. is displayed as "09". | |
| Minutes (m) | The letter "m" must be lowercase to distinguish minutes from months. | |
| m | Displays minutes without a leading 0 (zero) for single-digit minutes. For example, { TIME \@ "m" } displays "2". | |
| mm | Displays minutes with a leading 0 (zero) for single-digit minutes. For example, { TIME \@ "mm" } displays "02". | |
| A.M. and P.M. (AM/PM) | Displays A.M. and P.M. To change the A.M. and P.M. symbols for Microsoft Windows, change the regional settings in Windows Control Panel. | |
| am/pm or AM/PM |
Displays
A.M. and P.M. as uppercase. For example, { TIME \@ "h AM/PM" } and { TIME \@ "h am/pm" } display "9 AM" or "5 PM". Note: To display lower case, add a \*Lower switch i.e. { TIME \@ "h am/pm" \*Lower } displays "9 am" or "5 pm" |
|
Other text and punctuation |
||
| 'text' |
Any specified text in a date or time.
Enclose the text in single quotation marks. For example,
{ TIME \@ "HH:mm 'Greenwich mean time' " } displays "12:45 Greenwich mean time". |
|
| character | Includes the specified character in a
date or time, such as a : (colon), - (hyphen), *
(asterisk), or space. For example, { DATE \@ "HH:mm MMM-d, 'yy" } displays "11:15 Nov-6, '99". |
|
| `numbereditem` | Includes in a date or time the number of
the preceding item that you numbered by using the
Caption command on the Insert menu (Reference submenu),
or by inserting a SEQ field. Enclose the item
identifier, such as "table" or "figure," in grave
accents (`). Microsoft Word displays the sequential
number in arabic numerals. For example, { PRINTDATE \@ "'Table' `table` 'was printed on' M/d/yy" } displays "Table 2 was printed on 9/25/02". Note: Quotation marks are not required around simple date-time pictures that do not include spaces or text - for example, { DATE \@ MM/yy }. For more complex date-time pictures and those that include spaces or text, enclose the entire date-time picture in quotation marks, for example, { DATE \ @ "dddd MMMM d, yyyy', at' h:mm" }. Microsoft Word adds quotation marks to date-time picture switches if you insert a field by using the Date and Time command or the Field command (Insert menu). |
|
| Lock Result (\!) field switch | Prevents a field that is included in the
result of a BOOKMARK, INCLUDETEXT, or REF field from
being updated unless the field result in the original
location has changed. Without this switch, Microsoft Word updates fields included in a field result whenever the BOOKMARK, INCLUDETEXT, or REF field is updated. For example, the field { INCLUDETEXT C:\\Sales\Qtr4 Sales.doc \! } inserts the contents of the document "Qtr4 Sales.doc," which contains a DATE field and an EMBED field. If you update the INCLUDETEXT field, the "\!" switch prevents Word from updating the DATE and EMBED fields in the included text unless they are first updated in the original document ("Qtr4 Sales.doc"). The switch ensures that the text inserted by the INCLUDETEXT field matches the text in the original document. To update the DATE and EMBED fields in both locations, update fields in the original document ("Qtr4 Sales.doc"), and then update the INCLUDETEXT field. |
|
Field calculations
Another very useful document is Paul Edstein's Word Field Maths tutorial, which explains field calculations in some depth, in an easy to follow style, and which can be downloaded from this site.