Graham Mayor
... helping to ease the lives of Microsoft Word users.
 |
 |
 |
Many people access the material from this web site daily. Most just take what they want and run. That's OK, provided they are not selling on the material as their own; however if your productivity gains from the material you have used, a donation from the money you have saved would help to ensure the continued availability of this resource. Click the appropriate button above to access PayPal.
Mail merge graphics
See also Mail Merge Graphics Add-In, which provides a simple method of inserting the graphics merge field structure discussed in greater depth on this page.
The principle is similar throughout. You use field information within the data file - maybe by adding a field to provide the name and/or path of the image, or by deriving the name as in the following example which employs a directory merge (called catalog before Word 2002) to add signatures from filenames based on the associated names.
The files are jpg scanned images of signatures, here named after the people whose signatures they represent.
Store the images
Create a data file
The following example data file is a Word table, but any type of compatible data file (new or existing) could be used - and of course that file could contain as many other fields as required.

Create the merge document

Here the fields have been inserted by hand, using CTRL+F9 to place the field boundaries { }. The cells of the table have been enlarged to accommodate the full content for clarity. You could use the merge field tools on the merge toolbar (mailings ribbon in Word 2007/2010) to place the merge fields, but for this exercise it is simpler to place them by hand.
Note the construction of the IncludePicture field here. The 'picture' filename is constructed from
the first and last names, and obtained from the data file by using those two fields together
without a space between them. The path - here the images are stored in
a folder called E:\Temp - requires the use of two backslash path separators.
IncludePicture is not case sensitive.
The images should display correctly while previewing the records from the merge document, and any records with missing graphics will display the graphic from the previous record if the \d switch is not included thus:
{INCLUDEPICTURE "{IF TRUE "E:\\Temp\\{Mergefield FirstName}{Mergefield LastName}.jpg"}" \d }
Thanks are due to fellow MVP Paul Edstein for pointing out the trick using the IF TRUE construction to ensure merged graphics are correctly rendered.
You can use a variation of this method when the path to the image is stored in the data source, either with together with the image field or as a separate field e.g.
{INCLUDEPICTURE {IF TRUE "{Mergefield Path}\{Mergefield FirstName}{Mergefield LastName}.jpg"} \d }
{INCLUDEPICTURE {IF TRUE "{Mergefield Path}{Mergefield Image}.jpg"} \d }
The construction can be varied according to what is stored in your data source.
Merge to a new document.
If you merely use a an INCLUDEPICTURE field without the additional 'IF TRUE' construction, when you merge, the overwhelming probability is that the images will not be present in the merged document. Alternatively, all the records may display the same image. This is because the fields require updating to display the correct image. It does not mean that the merge hasn't worked.

In those circumstances, merge to a new document, select the new document - CTRL+A - then press F9 to update (or you could use the update macro suggested at Installing Macros From Listings attached to a toolbar button). This will display the correct images as below.
If instead of the above, you get the following, then this simply means that the field display toggle is incorrectly set. ALT+F9 will toggle the display to show the correct view as above.
IncludePicture fields do not work as anticipated when included as the result of a conditional (IF) field. For a workaround, see Formatting Word fields with switches.
Some users have reported that they cannot get the image to display using the INCLUDEPICTURE field. If this is the case and you are using : Microsoft Word 2002 SP-2 Update: October 16, 2002; Microsoft Word 2000 SR-1 Update: October 16, 2002 or Microsoft Word 97 for Windows Patch, then see - https://support.microsoft.com/?kbid=330079
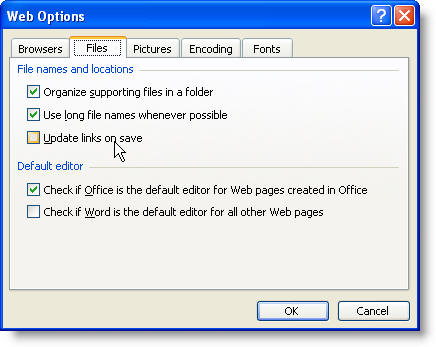
If you find that on merging to a new documents the resulting paths have been changed to something like: {IncludePicture "../../../program%20files/My Program//ProductPictures/ImageName.jpg" \* MERGEFORMATINET} and the merge does not work correctly:-
Select Tools > Options > General > Web Options and uncheck 'Update links on save'
For Word 2007, click the 'pizza button'  and select
Word Options > Advanced > General > Web Options
(the dialog so produced is virtually identical).
and select
Word Options > Advanced > General > Web Options
(the dialog so produced is virtually identical).
For Word 2010 and later the same dialog is accessed from the File Tab > Options > Advanced > General > Web Options
Constraining the size of the image
The method described will insert the image at its full size, so if you wish to display an image at a certain size, the simplest solution is to edit the images and save them at the size required, for which you will need a graphics application. There are free ones that do a fine job of scaling such as Google Picasa 2, however this is not always convenient, so the following method, while even more of a fiddle to set up than that already described, will do the job.
It relies on the premise that an image inserted into a table cell (or text box) will adapt to the fixed width of that cell or text box. I don't like using text boxes in merges, as they behave unpredictably (as they are in the drawing layer of the document), so this leaves table cells, which have the advantage of being easier to manage.
In the following example, I have used a simple database which contains the names of the images, which I have placed on the right side of the label, associated with text and fields on the left. S uch an application may be used for (e.g.) name badges. The principles involved are much the same as those already described, with the addition of a few extra steps.
READ ALL OF THE FOLLOWING BEFORE JUMPING IN!
There are pitfalls along the way that are explained at the end.
Start with a straightforward label merge - The instructions are for Word 2002 onwards, but similar techniques can be applied to earlier versions.
Mail Merge to labels with Word 2002/3
Mail Merge to labels with Word 2007 and later versions
This uses the data from the following Word table. the 'names' are the names of the images I will be merging. Obviously you would expand this data to your own requirements, according to what you want to appear on the label.

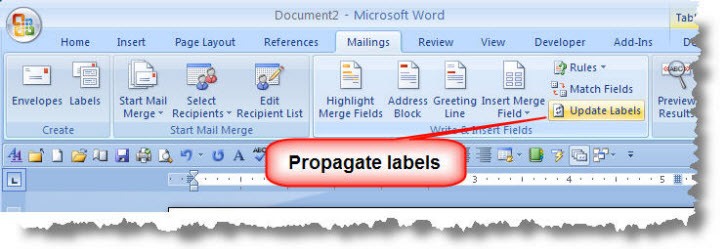
Next step is to propagate the data to all the labels - note that at this point we are not interested in the graphic.
With Word 2007 omwards, the tool to propagate labels is on the mailings tab of the ribbon and called 'Update Labels'
Now it starts to get more complicated.
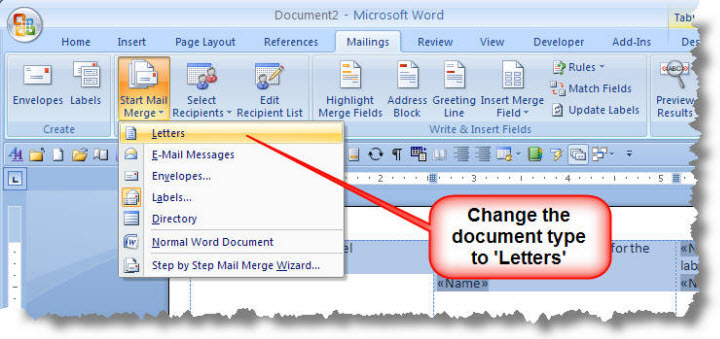
Change the document type from Mailing Labels to Letters. This will kill the propagation tool, which we will not need again.
In Word 2007 onwards, this function is available from the mailings tab of the ribbon
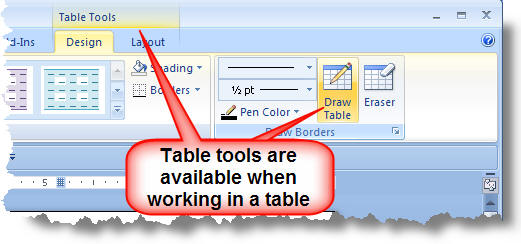
Display the Table toolbar:
In Word 2007 onwards the table tools sub menu ribbon is available when working in a table. The equivalent tool is available from that ribbon.
From that toolbar, select Draw Table. This will give you a 'pencil' shaped cursor which you can use to draw extra boxes in the table. The plan is to draw a vertical line down the centre of each column, splitting it in two.
This forces the text already there to the left of the split columns. The following illustration shows the first split column. repeat for the remaining columns.

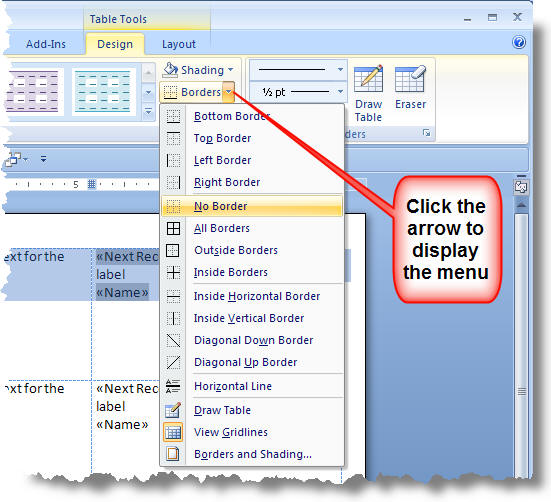
If you don't want the dividing line to appear between the split cells, select the whole table and apply the no borders option from the tables toolbar:
In Word 2007 onwards the borders tool is again on the Table Tools sub menu ribbon
Small cells make the construction of large fields rather difficult as you cannot see what you are typing once the cursor reaches the bottom of the cell. So open a new blank document and enter the following.

Select it (as shown) and copy to the clipboard. It is probably a good idea to attach the merge data file to the document containing the field to make sure it works correctly before copying to the clipboard. A misplaced space (for example) is sufficient for it not to work.
You will notice the reference to a Blank.jpg file inserted when the IF condition is not met. This is important. You can create a 1x1 pixel jpg graphic in Windows Paint and save it as Blank.jpg- or you can simply download from here. In the example, the 'blank image is stored in and recovered from the "D:\My Documents\My Pictures" folder. The actual location doesn't matter as long as you address it in the field, using double '\\' slash marks as folder separators.
Return to the prepared label document. Select the empty columns. (You can select alternate columns by holding the CTRL key.)
Next paste the contents of the clipboard into the selected columns. If you have done it correctly, each selected cell will have a copy of the field construction from the other document.
If you toggle the display you may get a partial image displayed in each cell. It will almost certainly be the same partial image. This is not an error!
GOTCHA!
Finally merge to a new document, select that document (CTRL+A) then update the fields (F9). You will see that if you have plain text in the left side of the labels then you will have extra labels containing that text.
You can get around this by using a conditional field to place the text part of the label. Again the simplest way to do this is to construct the field in another document and paste it into the label. Obviously it will be simpler to do this at the start of the merge.

When pasted it will look like:
and the final result should then look like:
Mail merge graphics
There are many applications where it may be required to merge an image into a mail merge, based upon the content of the data file. e.g. in merge letters, you may wish to include signatures; in a catalogue you may wish to merge pictures of the items; or you may wish to produce ID badges with photos of the intended wearers.