Graham Mayor
... helping to ease the lives of Microsoft Word users.
 |
 |
 |
Many people access the material from this web site daily. Most just take what they want and run. That's OK, provided they are not selling on the material as their own; however if your productivity gains from the material you have used, a donation from the money you have saved would help to ensure the continued availability of this resource. Click the appropriate button above to access PayPal.
Mail merge with Word 2007/2016
Those who struggled to adapt from the relatively straightforward merge process in Word 2000 to the apparent complexity of Word 2002/3 now have an all new set of dialogs to achieve the same ends. However the old Word 2000 Mail Merge Helper is still buried in the application code and can be added to the QAT (Quick Access Toolbar) to provide the old familiar dialog for those Luddites not yet ready to move on.
In fairness to Microsoft, the new ribbon commands do tend to make the merge process simpler, so while you can still use old and familiar tools, you may as well get used to learning the new methods of working and move on to the merge process.
Create the merge layout document
Although this page is primarily concerned with label merges, there is no essential difference between the different types of merge available from Word. Labels were chosen as an example simply because they are the most complex. Word also provides form letter, directory (called catalog in some earlier versions), e-mail and envelope merges.
Letters - a new page is created for each record
E-Mail messages- merge to e-mail?
Envelope - a form letter type of merge, that additionally allows envelope document
selection. You could instead use a form letter merge with a document created from
an envelope template (samples available from the
downloads page)
Labels - the main topic of this page
Directory(Catalog) - a new line is created for each record
Normal Word Document - removes any attached data file.
On the Mailings tab of the ribbon select the Start Mail Merge icon to choose the document type - here labels. From that same function, you can select the Mail Merge Wizard from which the process is pretty much the same as it was when using the wizard in Word 2002-3. (The illustration if from Word 2007, but the process is virtually identical in Word 2010 onwards.
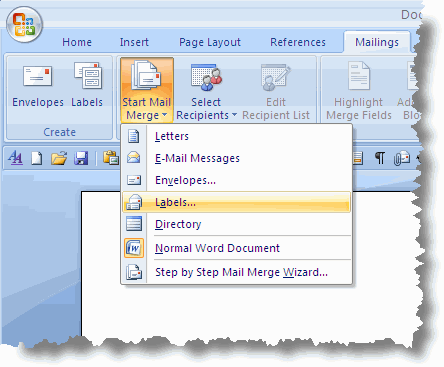
This labels selection provides the opportunity to pick the label type that matches your label stock, or even to create your own layout for some obscure label variety that does not match one of the many pre-configured types. The dialog below shows a custom label, but there are hundreds of standard labels from which to choose.
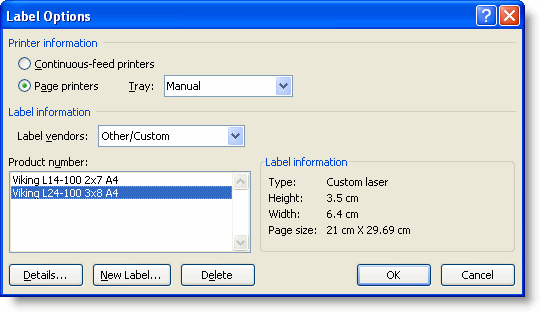
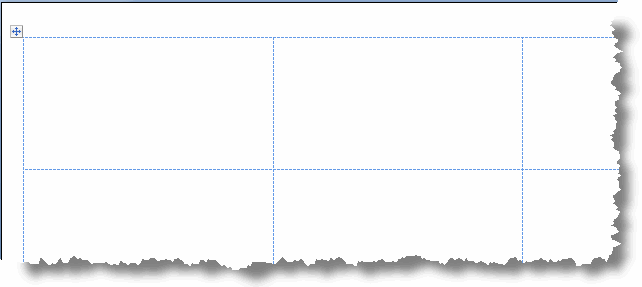
Assenting to the label choice produces a page comprising an empty table ready to receive your layout.
If you wish to start instead from a label template or a previously created table document that will represent the finished labels, click 'Cancel' at the above dialog. This will set the current document as the label merge document.
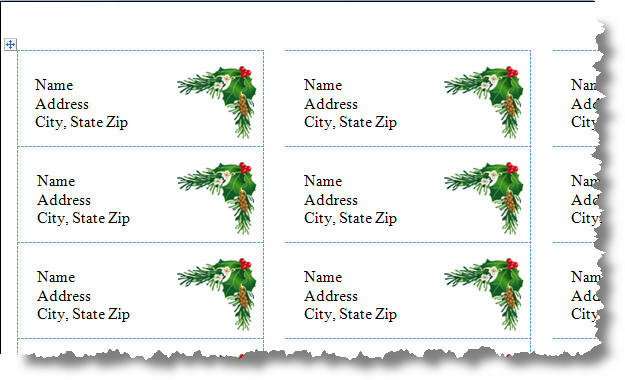
If that label template is one of the label template formats that you can download from the Microsoft web site eg https://office.microsoft.com/en-gb/templates/TC102450901033.aspx as shown in the next illustration, you will see that the table cells are filled with text entries denoting Name, Address, City, State & Zip.
These are NOT merge fields but simple text entries. Replace the text in the first cell with the fields from your data source as described later on this page and update (propagate) the labels to replace the text in the other cells.
Choose the data source
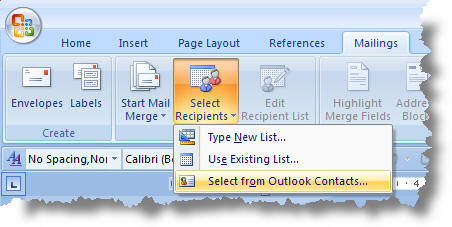
Word can use a wide variety of data sources. The 'Select Recipients' icon offers the option to type a new list, to use an existing list or to select from Outlook Contacts. (Outlook 2007 still provides the option to start the merge from Outlook for even greater flexibility - the procedure is essentially the same as that for Outlook 2003).
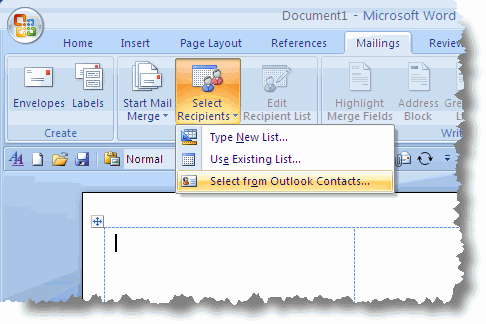
If you chose to use an existing data source, by default Word 2007 will try and connect to a data source in the 'My Data Sources' folder. This will not help much if the data source is a Word or Excel document, for example, in some other folder.
Don't be thrown by the two default entries shown in the illustration below, simply move to the folder that contains your data file and select it.
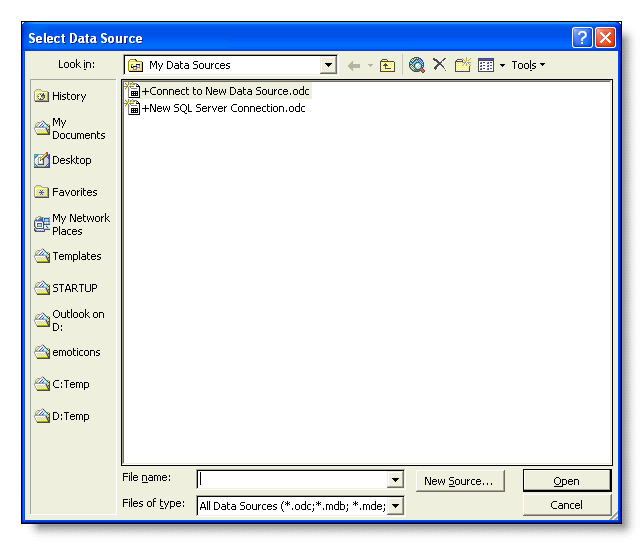
There is no mechanism included by which the My Data Sources folder can be set to a different location; however, you can set the data source folder to a path on the same drive as the My Documents folder by means of a registry hack. The folder is defined at:
HKEY_CURRENT_USER\Software\Microsoft\Office\12.0\Common\DataServices
or in Word 2010 at
HKEY_CURRENT_USER\Software\Microsoft\Office\14.0\Common\DataServices
or in Word 2013 at
HKEY_CURRENT_USER\Software\Microsoft\Office\15.0\Common\DataServices
and in Word 2016 at
HKEY_CURRENT_USER\SOFTWARE\Microsoft\Office\16.0\Common\DataServices
These keys are created the first time you attempt to access a data source for a merge. If the relevant key is not present at the time you edit the registry you can add it.
Edit the 'MyData' sub key to the required folder name (without quotes). The start point for the path is My Documents and the entry in the data key would be a sub folder of My Documents, which by default is the My Data Sources sub folder. If the DataServices key has no entry the default setting is used. To move up to My Documents enter . (a period/full stop). To move up two folders enter .. (two periods/full stops).
Although I have not tested it, the convention is one period/full stop for each level, so if your My Documents folder is buried deeper, in theory at least you should be able to add extra periods/full stops to take you back to the root level of the drive. I regret I have not found a way to change drives within this mechanism.
This method allow you to move the folder to a different path location. e.g., here I have My Documents as a sub folder of the D: drive i.e. "D:\My Documents" thus the default setting for the data folder would be "D:\My Documents\My Data Sources" . To move that data folder to "D:\My Documents" you would change the default My Data Sources entry for a period/full stop to move up a level.
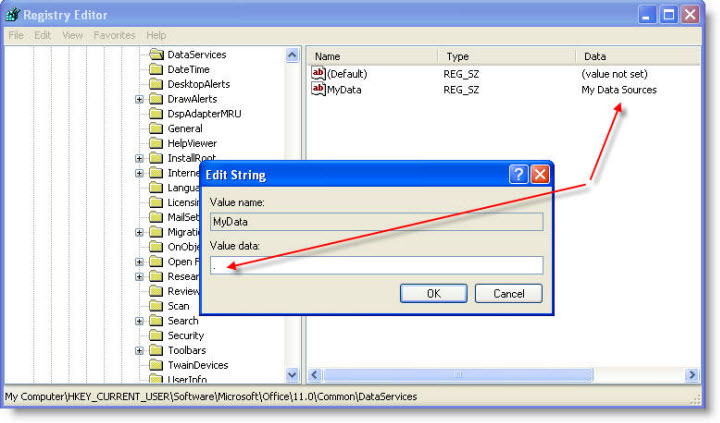
To move to another sub folder of My Documents eg "D:\My Documents\Merge" simply change the default "My Data Sources" to "Merge"
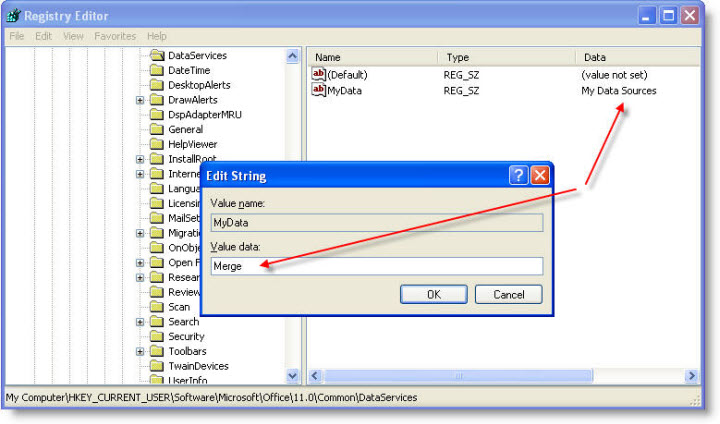
and to move to a different branch of the folder structure eg to "D:\Merge", add the period/full stop to the path as below:
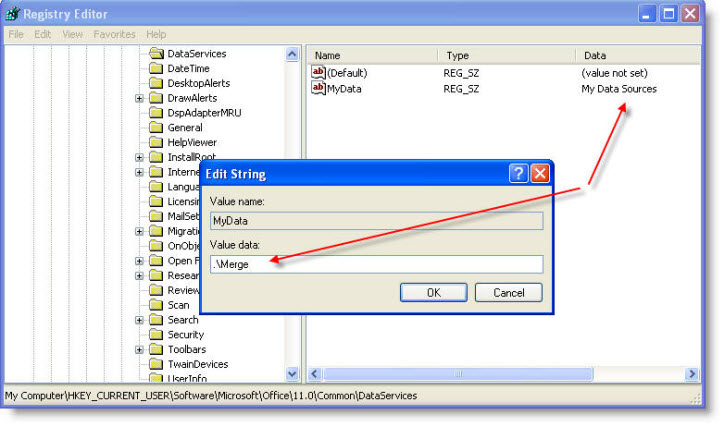
Word XP introduced further complications for those merging from Excel data, retained in Word 2007/2010. In earlier versions of Word connection to the data file was by DDE. Microsoft has replaced this default setting by a new OLEDB connection method. This has benefits and drawback. The benefits are that Word can now connect to client/server databases such as SQL or Oracle without resorting to an intervening interface such as MSQuery.
One downside is that OLEDB provides direct access to the data and thus Word is expected to provide the formatting. You can often work round this by applying formatting to the fields in Word. or you can revert to the earlier DDE connection method.
In order to do this, you need to make a change to one of the Word Options settings.
Click the 'Pizza Button'
 then select Word Options.
In Word 2010 it would be File > Options
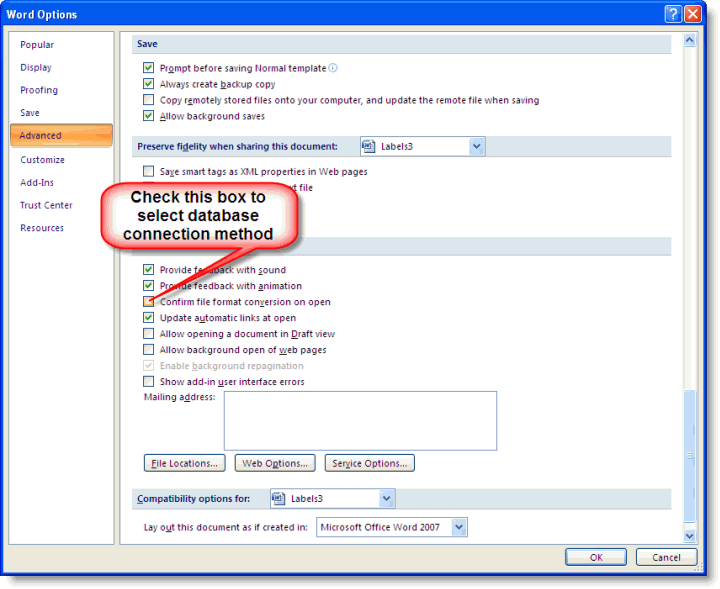
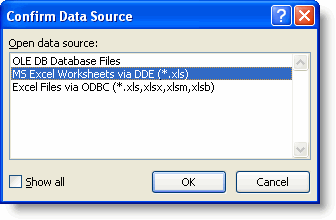
This provides the opportunity, when connecting to an Excel data file, to select the type of connection, from which you can select DDE, whereupon the connection should behave as it had in Word 2000.
Outlook Contacts
The following assumes that an Outlook Contacts list is selected.

Click OK and the next dialog provides options to filter the data etc.

In the above illustration the Edit button is not available. To edit the contacts data, you must do so from Outlook. However, with other data sources, particularly those created from the Select Recipients button, you can edit the data source by selecting the data source name in the lower window. See below ...
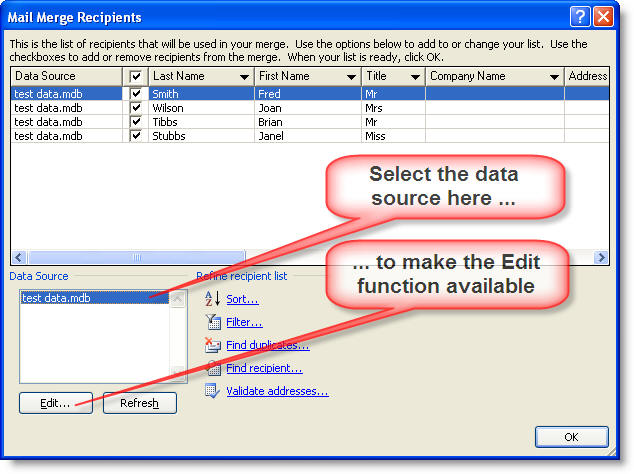
In either case, you can return to the above dialog by clicking the 'Edit Recipient List' button.

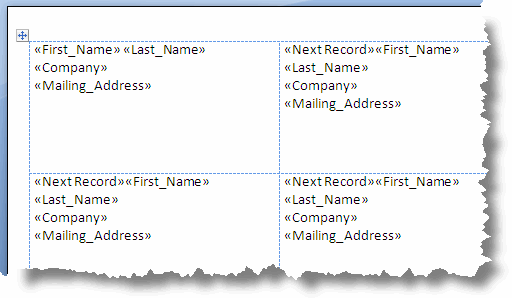
Insert the fields Having picked the address book or data file you wish to use, Word will verify the data file, read the field names and insert 'Next Record' fields in all the cells except the first (if you start from an existing document, the next record fields are added later).
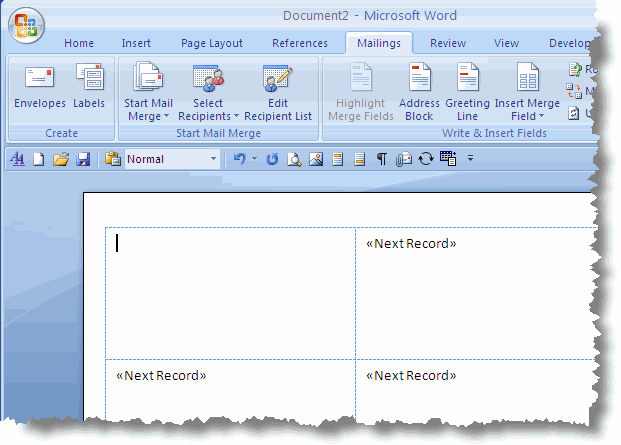
You can ignore all the cells, except the first, for that is where we are going to build our label.
You can either insert an address block field from the Address Block button on the ribbon, which produces the next dialog. This function is much improved from Office 2002/3, and will probably provide the layout you require with no further effort; however if you wish to include conditional fields or cannot achieve the layout you require then you will need to insert the individual fields that make up the address separately, and this is shown in the following illustrations:
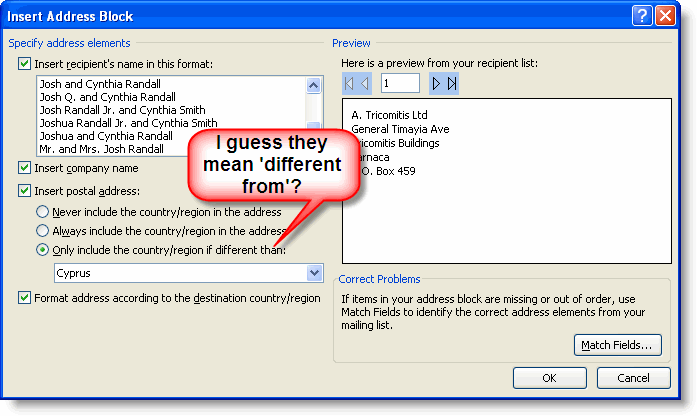
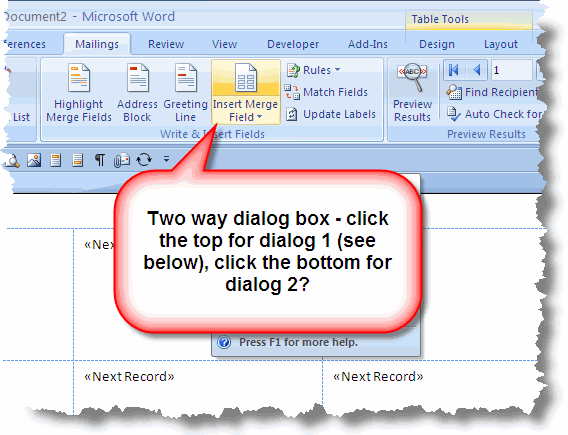
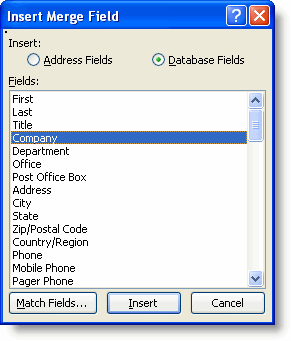
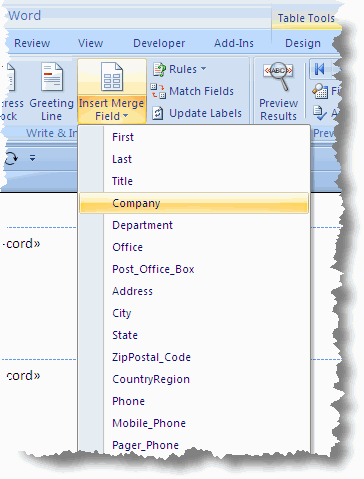
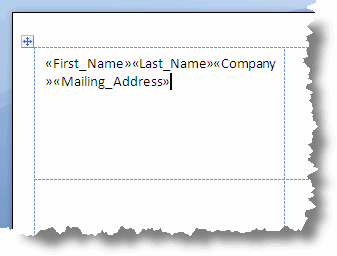
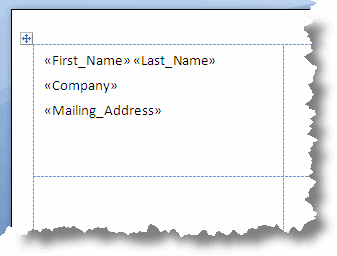
Don't worry too much about field placement initially. You will probably produce something like something like that shown in the left illustration below. You can then move the fields around to give you the required spacing and position as in the illustration on the right.
Microsoft appears to have retained the default use of the 'normal' paragraph style to format tables; however, in Word 2007/2010, the normal paragraph style has added spacing. This will result in extra spacing between the lines of text in tables. Word uses tables to create labels; however when those labels are created using the label tool the process is supposed to remove that extra spacing. In practice I find that it is not 100% reliable, but that is what is supposed to happen.
The default style set also includes a standard 'No spacing' style which is what long standing Word users would have expected to have been the Normal style. Why Microsoft swapped these styles around I cannot say, but .....
You can edit the Normal paragraph style to remove that spacing, just as you can edit any other style, and this will fix the issue for labels you create from the label tool (I would also rename the No Spacing style to Normal Spaced and add to it the spacing you have removed from the normal style); however ......
Even more complicating is the fact that when mail merging labels, although the Normal style is used, extra padding is inserted as direct formatting, by the merge process, before each paragraph. This conspires to screw up the spacing of the paragraphs on your merged labels (see the right hand illustration immediately below this note).
You must take this into consideration when adding merge fields and apply whatever formatting you need to give the presentation you require. One method would be to apply a non-spaced style to the first label before updating the labels. If you have modified the Normal style as mentioned above, you can simply re-apply that Normal style, which has the effect of removing the padding.
The bottom line here is that if your labels have unwanted space, correction is a question of applying the correct formatting.
If you want to add graphics to the label, then see
Graphics on Labels.
If you want serial numbers, then see Numbered Labels.
All that remains, is to reproduce the finished layout in the other cells. The highlighted icon in the toolbar below, will 'propagate' the data into the remaining labels with the correct insertion of the 'Next Record' field at the start of the subsequent labels.
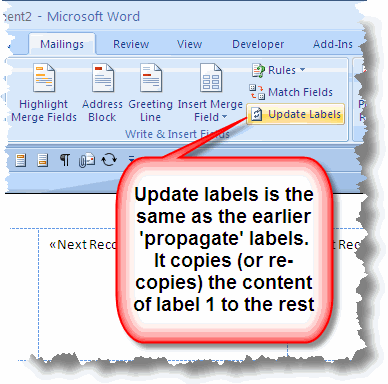
If the update button in the illustration above is 'greyed' out and thus unavailable, it is likely that you have not set the merge type to 'Labels'
Merge the data
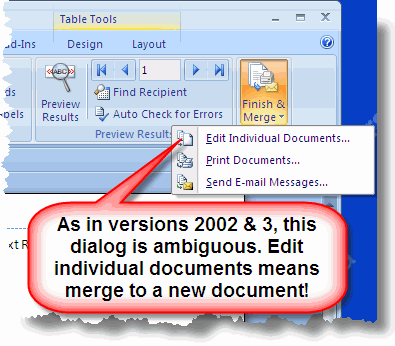
Merge to a new document to check the results, or, if confident of those results, merge directly to the printer.
The data shown in the example is taken from an old sample database and may not reflect the current addresses of the companies shown.
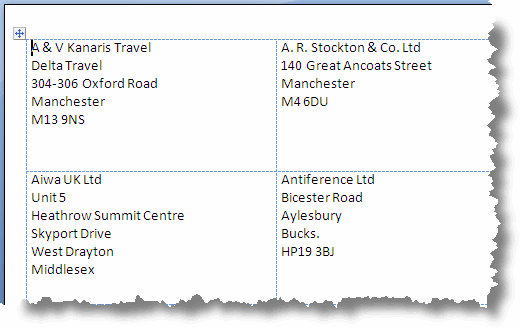
If you print and produce only one page of labels, when you think you should have more, please go back and re-read the instructions, for you have not completed the merge, but have printed the merge layout document. This is particularly relevant if you follow the merge wizard.
The merge layout document is now complete and can be saved for next time.
When merging from Outlook, the Outlook data is converted to a temporary file. This file will no longer be available next time you come to use the merge document. There are two suggested solutions. One is to detach the data source before finally saving, then re-attach it next time; the other is to begin the merge process from within Outlook itself, as that not only provides access to all the fields, and enables you to be selective about which records to merge, but allows you to save the data set as a file.
Initial field when merging from Outlook Contacts
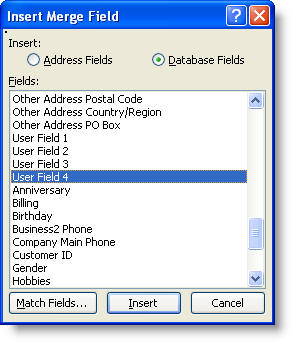
When merging from Outlook data, one field you will not find is a field that contains the initial letter of the contact's forename, which can be very useful when addressing envelopes and more formal letters etc. Sadly it is not yet possible to use only part of a field, however Outlook has four pre-configured user text fields. You can use one of these fields to hold the initial for use in merges.
To make this function more convenient to use, the following Outlook macro will extract the initial from the FirstName field and write it to the User4 field and you can then use it in a merge from Outlook as shown in the illustrations below.


Word 2007 also makes the four user fields available to a merge starting from Word, as opposed to starting the merge from Outlook as above. This enables you not only to use an initial as shown above, but to create a merge using the Categories field, which is not normally available from Word, by copying the content of the categories field to one of the other user fields (here User3) and using that as an alias for the Categories field.
Some of the Outlook field names are changed when the merge is started from Word as opposed to starting from Outlook.


Thanks to https://www.slovaktech.com/code_samples.htm for providing the germ of an idea to enable me to produce this code.
Public Sub AddIntialToUser4()
'Create this macro in OUTLOOK!
Dim objOL As Outlook.Application
Dim objNS As Outlook.NameSpace
Dim objContactFolder As Outlook.MAPIFolder
Dim objContact As Outlook.ContactItem
Dim objItems As Outlook.Items
Dim obj As Object
Dim strInitial As String
On Error Resume Next
Set objOL = CreateObject("Outlook.Application")
Set objNS = objOL.GetNamespace("MAPI")
'Set the default contacts folder
Set objContactFolder = objNS.GetDefaultFolder(olFolderContacts)
'or select the folder
'Set objContactFolder = objNS.PickFolder
Set objItems = objContactFolder.Items
For Each obj In objItems
'Test for contact and not distribution list
If obj.Class = olContact Then
Set objContact = obj
With objContact
strInitial = Left(.FirstName, 1)
.User4 = strInitial
'Copy initial to User4
.User3 = .Categories 'Copy the categories field content to User3
.Save
End With
End If
Err.Clear
Next
Set objOL = Nothing
Set objNS = Nothing
Set obj = Nothing
Set objContactFolder = Nothing
Set objContact = Nothing
End Sub
Mail merge
Those who struggled to adapt from the relatively straightforward
merge process in Word 2000 to the apparent complexity of Word 2002/3
now have an all new set of dialogs to achieve the same ends.
Although this page is primarily concerned with label merges,
there is no essential difference between the different types of merge available from Word.