Graham Mayor
... helping to ease the lives of Microsoft Word users.
 |
 |
 |
Many people access the material from this web site daily. Most just take what they want and run. That's OK, provided they are not selling on the material as their own; however if your productivity gains from the material you have used, a donation from the money you have saved would help to ensure the continued availability of this resource. Click the appropriate button above to access PayPal.
Using Macrobutton fields to insert information into documents and templates
Creating a check box toggle
Check boxes are usually the province of forms, but there are occasions when a check box may be desirable in an editable document. A macrobutton field can be used to effect this by using its prompt as the check box, in conjunction with a macro and an autotext entry.
Insert a Macrobutton field as follows, and use the empty box character from the Wingdings font. Format the character to the required size:
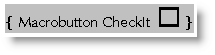
Toggle the display to show just the prompt

Select the field and save as an autotext entry (ALT+F3) called 'Unchecked Box'
Toggle the field and change the content as follows:
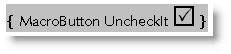
Toggle again and save this version as an autotext entry called 'Checked Box'.

Finally add the following macros to the document template:
ActiveDocument.AttachedTemplate.AutoTextEntries("Checked Box").Insert _
Where:=Selection.Range
End Sub
Sub UncheckIt()
ActiveDocument.AttachedTemplate.AutoTextEntries("Unchecked Box").Insert _
Where:=Selection.Range
End Sub
For Word 2007/2010 the autotext entry the code is slightly different:
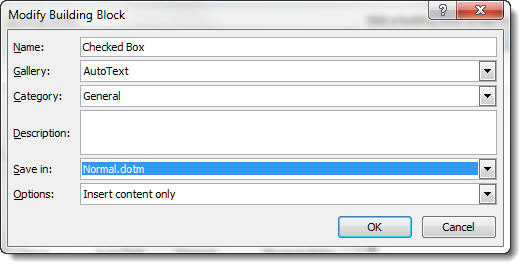
Ensure that the building bock autotext entry is stored in the required document template (by opening the template - or a document based upon it - to make it available to the dialog - all active global templates such as the normal template will be present in the list without having them opened in the document space). You can use the building blocks organiser to change the location of the entry. (Insert > Quick Parts > Building Blocks Organizer).
ActiveDocument.AttachedTemplate.BuildingBlockEntries("Checked Box").Insert _
Where:=Selection.Range
End Sub
Sub UncheckIt()
ActiveDocument.AttachedTemplate.BuildingBlockEntries("Unchecked Box").Insert _
Where:=Selection.Range
End Sub
If the autotexts are saved in the normal template (see illustration above) then for this to work in documents created from other templates, the macro code should read:
NormalTemplate.BuildingBlockEntries("Checked Box").Insert _
Where:=Selection.Range
End Sub
Sub UncheckIt()
NormalTemplate.BuildingBlockEntries("Unchecked Box").Insert _
Where:=Selection.Range
End Sub
Double clicking the field will replace it with the alternative version.
Insert address from Outlook
Although nothing to do with Macrobutton fields, as the following uses the same formats as the macros demonstrated later, I felt it appropriate to include the standard function to insert Outlook addresses here.
Provided Outlook is the Windows default e-mail application, you can use the Insert Address tool present in all recent versions of Word to insert addresses into documents and envelopes. The format of the inserted address may not be what you require and to some extent you can modify that layout to your personal requirements using the <PR> field set (see the list below) formatted as an autotext entry with the reserved name of AddressLayout. This is achieved in any Word version by entering the following layout in a Word document, selecting it and pressing ALT+F3
The following example adds the otherwise missing Company Name to the address (if present in the chosen record).
{<PR_GIVEN_NAME> <PR_SURNAME>
}{<PR_COMPANY_NAME>
}{<PR_POSTAL_ADDRESS>}
Note that despite Word's familiar use of the curly bracket as a field boundary (see, for example, the macrobutton examples below), the curly brackets shown in the example above are not fields but place markers. They are used in the manner shown to omit blank lines or spaces in the address should one or other component be missing. Thus if there is no Company Name associated with the contact. there will be no blank line between the name and the address.
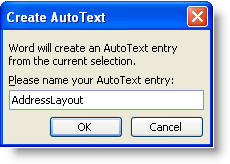
Having pressed Alt F3 what happens next is determined by the Word version. In Word 2000/3 you get the following dialogs:
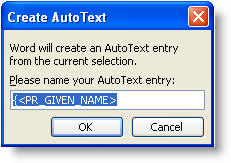
change the name to AddressLayout and click OK.
If there is already an autotext entry of that name, you will get the following warning:
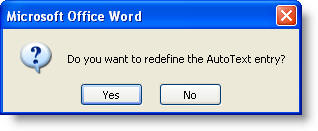
Click 'Yes'
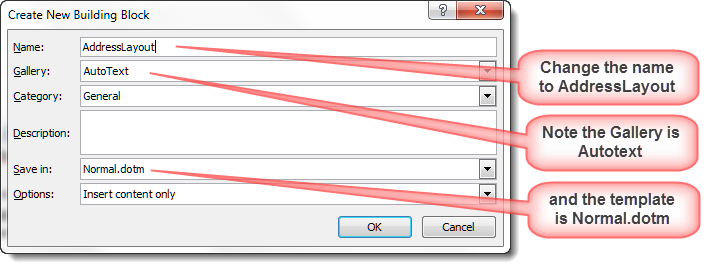
Word 2007/2010
Word 2007/2010 do things a little differently. e.g. when you press Alt+F3 in Word 2010 you get the following dialogs:
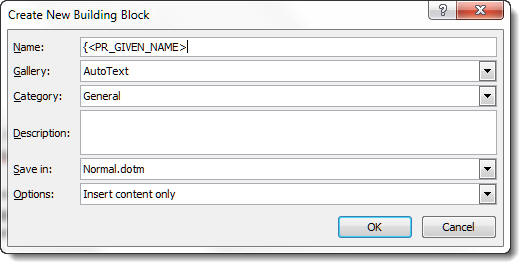
As with the earlier versions there will be a warning if the building block already exists.
Insert Outlook Address with VBA
You can also insert addressee details from Outlook into a letter, using VBA to give much more control over the layout and what is inserted. In this instance, insert the following field in the document template at the position the addressee information is to be placed:

The syntax is CTRL+F9 to position the field boundaries "{ }" ,then between the brackets, MacroButton macroname then the display prompt. You can have spaces in the prompt, but the first word after the fieldname will be treated as the macroname.
You could use Insert > Field to place the field, but it is simpler to enter directly from the keyboard. Toggle the field (ALT+F9) to display:

A single left mouse button click on the field will select the field allowing it to be overtyped. A double left mouse button click will run the macro attached to the field.
The macrobutton field can be used to run any macro e.g. you might wish to extract a name from your Outlook contacts list, for insertion on a template for writing company cheques:

or toggled:

The macro code for the two Outlook examples is
reproduced below.
For alternative methods of inserting
addresses from Outlook if available or from an address book if
not, I have prepared a pair of add-ins that simplify the
process. Click the links in this section.
Use Macrobutton field as a place marker
Without the macro, you could use the Macrobutton field as a place marker in a template. This would allow you to (for example) setup a letter head template without creating an on-line form with the limitations that imposes on the free application of text in a letter.
e.g.
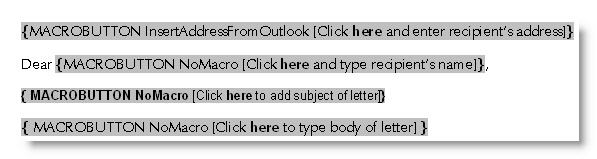
or toggled:

Macro Code to insert address (with optional barcode) from Outlook
Dim strCode As String
Dim strAddress As String
Dim iDoubleCR As Long
'Set up the formatting codes in strCode
strCode = "<PR_GIVEN_NAME> <PR_SURNAME>" & vbCr
strCode = strCode & "<PR_COMPANY_NAME>" & vbCr
strCode = strCode & "<PR_POSTAL_ADDRESS>" & vbCr
'Let the user choose the name from Outlook
On Error GoTo UserCancelled:
strAddress = Application.GetAddress("", strCode, False, 1, , , True, True)
'Eliminate blank lines by looking for two carriage returns in a row
iDoubleCR = InStr(strAddress, vbCr & vbCr)
While iDoubleCR <> 0
strAddress = Left(strAddress, iDoubleCR - 1) & Mid(strAddress, iDoubleCR + 1)
iDoubleCR = InStr(strAddress, vbCr & vbCr)
Wend
'Insert the modified address at the current insertion point
Selection.TypeText strAddress
'The following section for American users inserts a bar code
'Other users can omit this part.
'***************************************************
'Select the address block
Selection.MoveUp Unit:=wdLine, Count:=3, Extend:=wdExtend
ActiveDocument.Bookmarks.Add Range:=Selection.Range, Name:="sZip"
'Move to the end of the address and add the barcode
Selection.Collapse Direction:=wdCollapseEnd
Selection.TypeText vbCr
Selection.Fields.Add Range:=Selection.Range, _
Type:=wdFieldEmpty, Text:= _
"BARCODE sZip \b", PreserveFormatting:=True
'End of barcode section
'****************************************************
UserCancelled:
End Sub
As explained in https://support.microsoft.com/kb/897290 the POSTNET barcode that Word can create is now obsolete, so it was removed from the Envelope dialog starting in Word 2007. The field does however remain available to Word, though whether there is any benefit from using it is hard to say.
Macro Code to insert name and address from Outlook (with title and initial)
It is possible to use the same curly brackets that you might use when creating an AddressLayout autotext, to format the insertion of addresses when gathering and inserting data using VBA. This means that it is possible to simply eliminate abandoned spaces where the field in question contains no data.
Dim strTitle As String
Dim strAddress As String
Dim strForeName As String
Dim strSurname As String
Dim strCompany As String
strTitle = "{<PR_DISPLAY_NAME_PREFIX> }" 'Note curly brackets
strForeName = "<PR_GIVEN_NAME>"
strSurname = "<PR_SURNAME>"
strCompany = "{<PR_COMPANY_NAME>" & vbCr & "}"
'Note curly brackets
strAddress = "<PR_POSTAL_ADDRESS>"
'Let the user choose the contact from Outlook
On Error GoTo UserCancelled:
strTitle = Application.GetAddress("", strTitle, _
False, 1, , , True, True)
strForeName = Application.GetAddress("", strForeName, _
False, 2, , , True, True)
strSurname = Application.GetAddress("", strSurname, _
False, 2, , , True,
True)
strCompany = Application.GetAddress("", strCompany, _
False, 2, , , True, True)
strAddress = Application.GetAddress("", strAddress, _
False, 2, , , True, True)
If strForeName <> "" Then 'extract initial from forename
strFinal = strTitle & Left(strForeName, 1) & ". " & strSurname
strFinal = strFinal & vbCr & strCompany _
& strAddress
Else 'no forename
strFinal = strCompany & strAddress
End If
Selection.TypeText strFinal
UserCancelled:
End Sub
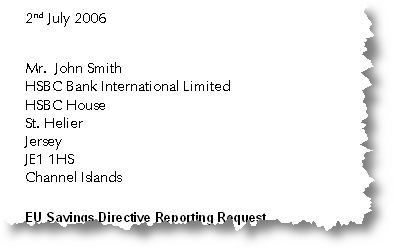
The following variation adds formatting, user prompts date, and variable text dependent on the field content from Outlook to fully automate a personal/business letter template.
The following macro uses paragraph styles which must be present in your template:
Date
Inside Address
Salutation
Subject Line
and Body Text.
Modify these styles to format the layout of the inserted items.
The date is inserted in UK format and the macro is laid out and documented to make it a relatively simple task to modify it to your personal requirements.
Dim strTitle As String
Dim strAddress As String
Dim strForeName As String
Dim strInitial As String
Dim strFriend As String
Dim strSurname As String
Dim strCompany As String
Dim strSubject As String
'Assign contact variables
strTitle = "{<PR_DISPLAY_NAME_PREFIX> }"
strForeName = "<PR_GIVEN_NAME> "
strSurname = "<PR_SURNAME>"
strCompany = "{<PR_COMPANY_NAME>}"
strAddress = "<PR_POSTAL_ADDRESS>"
strSubject = ""
'Let the user choose the contact from Outlook
'And assign the required components to variables
On error goto UserCancelled:
strAddress = Application.GetAddress("", strAddress, _
False, 1, , , True, True)
If strAddress = "" Then
MsgBox "User cancelled or no address listed", , "Cancel"
Exit Sub
End If
strTitle = Application.GetAddress("", strTitle, _
False, 2, , , True, True)
strForeName = Application.GetAddress("", strForeName, _
False, 2, , , True, True)
strSurname = Application.GetAddress("", strSurname, _
False, 2, , , True, True)
strCompany = Application.GetAddress("", strCompany, _
False, 2, , , True, True)
'If forename exists then extract initial and add a period (full stop).
If strForeName <> "" Then
strInitial = Left(strForeName, 1) & ". "
Else
strInitial = "" 'otherwise set initial to nul
End If
With Selection 'Insert the current date _
formatted with the date paragraph style and UK pattern switch
.Style = ActiveDocument.Styles("Date")
.InsertDateTime DateTimeFormat:="d" & Chr(160) & _
"MMMM" & Chr(160) & "yyyy", InsertAsField:=False
.TypeParagraph
End With
With Selection ' type in the name string _
using the Inside Address paragraph style
.Style = ActiveDocument.Styles("Inside Address")
.TypeText Text:=strTitle & strInitial & strSurname
.TypeParagraph
End With
If strCompany <> "" Then 'If Company field has content _
Set the Company line to bold and type in that content
'Ask user for subject line content
strSubject = InputBox("What is the subject line text of this letter?", _
"Subject")
With Selection
.Font.Bold = True
.TypeText Text:=strCompany
.TypeParagraph
.Font.Bold = False
End With
End If
'Now add the address
Selection.TypeText Text:=strAddress
Selection.TypeParagraph
If strSubject <> "" Then 'if subject text was entered _
type it in formatted with the Subject Line paragraph style
With Selection
.Style = ActiveDocument.Styles("Subject Line")
.TypeText Text:="Subject: " & strSubject
.TypeParagraph
End With
End If
With Selection 'Change the paragraph style to Body Text _
and enter the chosen salutation depending on field content _
and dialog box entry.
.Style = ActiveDocument.Styles("Salutation")
.TypeText Text:="Dear "
If strTitle = "" Or strForeName = "" Then
.TypeText Text:="Sir/Madam"
Else
'Forename is known so choose whether to use it
strFriend = InputBox("Use forename instead of" & vbCr _
& "initial with salutation?", _
"Friend?", "No")
If UCase(strFriend) <> "NO" Then
.TypeText Text:=strForeName
Else
.TypeText Text:=strTitle & strSurname
End If
End If
.TypeParagraph
.Style = ActiveDocument.Styles("Body Text")
End With
'Now write your letter ;)
UserCancelled:
End Sub
Macro Code to insert name and telephone number from Outlook with an alternative number when the requested number field has no content.
The following example demonstrates the insertion of a name from Outlook followed by a telephone number. The macro inserts the contact's business number if present, or the home number if not.
Dim strCode As String
Dim strAddress As String
Dim strName As String
Dim strPhone As String
strName = "<PR_DISPLAY_NAME>"
strPhone = "<PR_OFFICE_TELEPHONE_NUMBER>"
strCode = strName & vbTab & strPhone
'Let the user choose the contact in Outlook
On Error GoTo UserCancelled:
strAddress = Application.GetAddress("", strCode, _
False, 1, , , True, True)
'check the result for missing number
'i.e. line ends with TAB
If Right(strAddress, 1) = Chr(9) Then
'Define alternative number and grab the entry again
strPhone = "<PR_HOME_TELEPHONE_NUMBER>"
strCode = strName & vbTab & strPhone
strAddress = Application.GetAddress("", strCode, _
False, 2, , , True, True)
End If
'Insert the name and number at the current insertion point
Selection.TypeText strAddress
UserCancelled:
End Sub
The documented fieldnames for use with the above macros are listed below. Snag is that the list is not complete as Microsoft is a tad reticent about disclosing which fields are available. In particular, I cannot find any reference to the highlighted and extremely useful <PR_POSTAL_ADDRESS>, but it works just fine. There will almost certainly be other examples. If you know of any, mail me and I'll add them.
Address Property Name |
Outlook Contact Field |
| <PR_BEEPER_TELEPHONE_NUMBER> | Pager |
| <PR_BUSINESS_FAX_NUMBER> | Business Fax |
| <PR_CAR_TELEPHONE_NUMBER> | Car |
| <PR_CELLULAR_TELEPHONE_NUMBER> | Mobile |
| <PR_COMPANY_NAME> | Company |
| <PR_COUNTRY> | Country |
| <PR_DEPARTMENT_NAME> | Department |
| <PR_DISPLAY_NAME> | Full Name |
| <PR_DISPLAY_NAME_PREFIX> | Personal Title (Mr, Mrs. etc) |
| <PR_EMAIL_ADDRESS> | |
| <PR_GIVEN_NAME> | First Name |
| <PR_HOME_FAX_NUMBER> | Home Fax |
| <PR_HOME_TELEPHONE_NUMBER> | Home |
| <PR_LOCALITY> | City |
| <PR_OFFICE_LOCATION> | Office |
| <PR_OFFICE_TELEPHONE_NUMBER> | Business |
| <PR_OFFICE2_TELEPHONE_NUMBER> | Business2 |
| <PR_OTHER_TELEPHONE_NUMBER> | Other |
| <PR_POSTAL_ADDRESS> | Mailing address |
| <PR_POSTAL_CODE> | Zip/Postal Code |
| <PR_PRIMARY_FAX_NUMBER> | Other Fax |
| <PR_RADIO_TELEPHONE_NUMBER> | Radio |
| <PR_STATE_OR_PROVINCE> | State/Province |
| <PR_STREET_ADDRESS> | Street |
| <PR_SURNAME> | Last name |
| <PR_TITLE> | Job Title |
For variations to these fields used by the Personal Address Book, see https://www.slipstick.com/contacts/insword.htm
Grab the addressee information from a letter and create a new Outlook contact from it
The above examples are concerned with recovering date from Outlook contacts and inserting it into documents such as envelopes or letters; but if the address you require is not available from Outlook, you may wish to add it. The following macro will grab the pre-selected address from your letter and create an Outlook contacts entry from it.
The following is a real world example (albeit with a fictitious name):
Select the address.
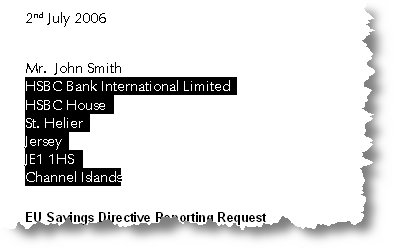
Do not select the personal contact name at this stage.
Run the macro AddOutlookCont (code at the end of this section) which pops up a message box to enable you to check whether the selected address is really what you intended. If the following dialog box does not contain an address, no address has been selected.
Click 'No' and select the address again.

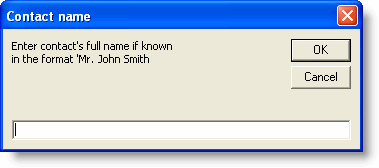
If the address shown is correct, click 'Yes'. You are now prompted for the personal contact information. Because of the many ways this can be expressed, it is difficult or impossible to make an automatic selection of the contact from the addressee information, so the information is entered manually into the next dialog box:
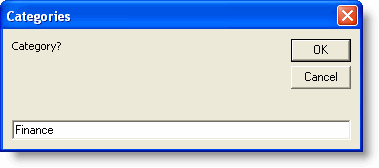
The macro also offers the option to add a category for filing in Outlook:
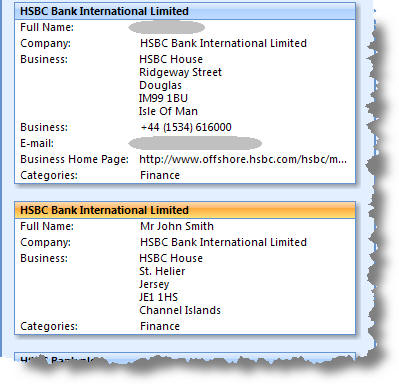
and if all goes according to plan, the contact is written to Outlook, as highlighted below:
'Requires a reference to the Outlook Object Library
Dim ol As New Outlook.Application
Dim ci As ContactItem
Dim strAddress As String
Dim strName As String
Dim strFullName As String
Dim strBusiness As String
Dim iSplit As Long
Dim iResult As Long
strAddress = Selection.Range
'store the selected address
iResult = MsgBox("Is the address correct?" & _
vbCr & vbCr & strAddress, vbYesNo, "Address")
'ask user to check address
If iResult = 7 Then GoTo UserCancelled:
'User has clicked No
'Add personal contact - if known
strFullName = InputBox("Enter contact's full name if known" _
& vbCr & "in the format 'Mr. John Smith", "Contact name")
On Error GoTo UserCancelled:
'error trap - address not selected
'Ascertain the number of characters on the first line
iSplit = InStr(strAddress, Chr(13))
'Store the first line as the Company Name
strName = Left(strAddress, iSplit - 1)
'Store the remaining lines as the business address
strBusiness = Right(strAddress, (Len(strAddress) - Len(strName)))
'Now create a contact entry
Set ci = ol.CreateItem(olContactItem)
ci.MailingAddress = strBusiness
ci.CompanyName = strName
If strFullName <> "" Then ci.FullName = strFullName
ci.FileAs = strName
'Request a category
ci.Categories = InputBox("Category?", "Categories")
ci.Save
' ol.Quit 'Remove the first
quote to let the macro close Outlook
Set ol = Nothing
Exit Sub
UserCancelled: 'Error handler
MsgBox "User Cancelled or address not selected"
Set ol = Nothing
End Sub
Macrobutton fields
The macrobutton field can be used as a place marker within a document or template, or, as the name implies, be used to run a macro. This page demonstrates a some potential uses for this handy field.