Graham Mayor
... helping to ease the lives of Microsoft Word users.
 |
 |
 |
Many people access the material from this web site daily. Most just take what they want and run. That's OK, provided they are not selling on the material as their own; however if your productivity gains from the material you have used, a donation from the money you have saved would help to ensure the continued availability of this resource. Click the appropriate button above to access PayPal.
Select e-mail account when sending Outlook message
When using Outlook to send e-mail messages, Outlook by default will send new messages using the default e-mail account. However where there is more than one account available, Outlook will reply or forward messages using the account to which the received messages were posted.
This is not always convenient and sometimes users may wish to choose from the available accounts when they send messages.
You can, from the message dialog, change the account from which the message will be sent, by clicking the little arrow adjacent to the From button (see below):
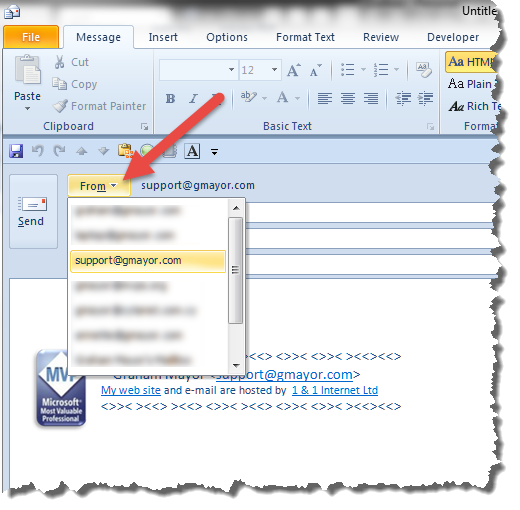
But it is easily overlooked. This page is therefore aimed a providing an easily reproducible macro solution that will prompt for the account when you click Send and force the user to select an account from which the message is to be sent.
The following assumes some VBA knowledge, but for those who have not used VBA listings before, see https://www.gmayor.com/installing_macro.htm as a first step. That page is based on Word VBA, but the principles for Outlook (or other VBA enabled Office applications) are exactly the same.
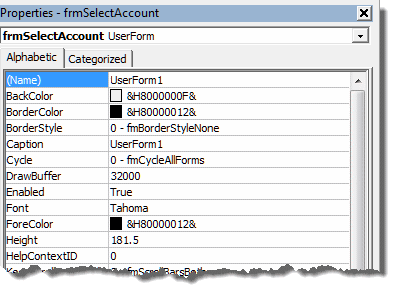
Start by creating a userform. The userform employed by the process is simple. It uses the default names for all the elements except the userform itself, which should be called 'frmSelectAccount'.
Click ALT+F11 to open the VBA editor. From the editor's menu bar select 'Insert' then 'Userform' from the dropdown. From the Userform's properties change the name to frmSelectAccount as shown below:
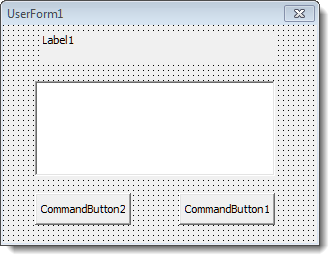
Add a label, a list box and two command buttons to the userform as shown in the following illustration. You don't need to concern yourself over the names of the elements, their size or location. The names are the default names automatically applied and the rest are fixed in the macro that calls the form:
From the Project Explorer (CTRL+R) Right Click frmSelectAccount and select 'View Code' from the dropdown options. A code window will open into which the following code should be pasted:
Private Sub ListBox1_Click()
If Me.ListBox1.ListIndex > -1 Then
Me.CommandButton1.Enabled = True
End If
lbl_Exit:
Exit Sub
End Sub
Private Sub Userform_Initialize()
Me.CommandButton1.Enabled = False
lbl_Exit:
Exit Sub
End Sub
Private Sub CommandButton1_Click()
Me.Hide
Me.Tag = 1
lbl_Exit:
Exit Sub
End Sub
Private Sub CommandButton2_Click()
Me.Hide
Me.Tag = 0
lbl_Exit:
Exit Sub
End Sub
Private Sub UserForm_QueryClose(Cancel As Integer, CloseMode As Integer)
If CloseMode = vbFormControlMenu Then Cancel = True
lbl_Exit:
Exit Sub
End Sub
From the Project Explorer then select Microsoft Outlook Objects > ThisOutlookSession
In the 'ThisOutlookSession' code window, copy and paste the following:
Private Sub Application_ItemSend(ByVal Item As Object, Cancel As Boolean)
Dim bSend As Boolean
bSend = SendUsingAccount(Item)
If bSend = False Then Cancel = True
lbl_Exit:
Exit Sub
End Sub
Private Function SendUsingAccount(olItem As MailItem) As Boolean
Dim oAccount As Outlook.Account
Dim strAcc As String
Dim i As Long
Dim oFrmAcc As New frmSelectAccount
With oFrmAcc
.BackColor = RGB(191, 219, 255)
.Height = 190
.Width = 240
.Caption = "E-Mail Accounts"
With .CommandButton1
.Caption = "Send Message"
.Height = 24
.Width = 72
.Top = 126
.Left = 132
End With
With .CommandButton2
.Caption = "Quit"
.Height = 24
.Width = 72
.Top = 126
.Left = 24
End With
With .ListBox1 'add your list of email addresses
.Height = 72
.Width = 180
.Left = 24
.Top = 42
For Each oAccount In Application.Session.Accounts
.AddItem oAccount
Next oAccount
.ListIndex = -1
End With
With .Label1
.BackColor = RGB(191, 219, 255)
.Height = 24
.Left = 24
.Width = 174
.Top = 6
.Font.Size = 10
.Caption = "Select the e-mail account from which to send this message"
.TextAlign = fmTextAlignCenter
End With
.Show
If .Tag = 0 Then
SendUsingAccount = False
Unload frmSelectAccount
Exit Function
End If
With oFrmAcc.ListBox1
For i = 0 To .ListCount - 1
If .Selected(i) Then
strAcc = .List(i)
Exit For
End If
Next i
End With
End With
Unload oFrmAcc
For Each oAccount In Application.Session.Accounts
If oAccount.DisplayName = strAcc Then
olItem.SendUsingAccount = oAccount
SendUsingAccount = True
Exit For
End If
Next
lbl_Exit:
Set oAccount = Nothing
Set oFrmAcc = Nothing
Exit Function
End Function
That's about it. Now when you click 'Send' the macro intercepts that command and displays the formatted version of the userform, with the list box displaying the available accounts.
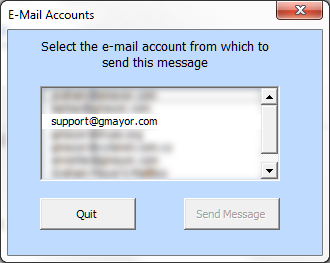
No item is selected in the list. Selecting an item makes the Send Message command button available and that will send the message using the selected account. Quit, will not send the message, but return to the message itself.
Outlook Accounts
For Outlook users who have more than one e-mail account available, this page features a basic interception of the Send command, to add a process to force the user to select the account from which the message is sent.
When this macro is used as supplied, no message can be sent without the user specifically selecting an account from the available listed accounts.