Graham Mayor
... helping to ease the lives of Microsoft Word users.
 |
 |
 |
Many people access the material from this web site daily. Most just take what they want and run. That's OK, provided they are not selling on the material as their own; however if your productivity gains from the material you have used, a donation from the money you have saved would help to ensure the continued availability of this resource. Click the appropriate button above to access PayPal.
<>Using alternative return addresses on envelopes from the Envelope/Label Wizard
While developed for Word 2003, the following methods will work in Word 2007/2010; however with version 2007 Microsoft completely altered the use of autotext entries. Before approaching these methods in Word 2007/2010, you should make yourself familiar with Quick Parts and the Building Block Organizer.
You will find some examples of creating autotext entries using the new functions on the Macrobutton page. If this seems like too much trouble then consider instead the Envelope & Labels Add-in which includes the facility to include return addresses and logos on both envelopes and labels.
When the option to display a return address on an envelope is chosen, that return address is picked up from the User Information address panel under Word's Options.
You can only enter one address here, but many people use the same copy of Word to prepare letters (with return addresses) for various organizations, which precludes the use of the envelope wizard to add the return address - unless you feel the inclination to re-enter the user information for each envelope printing task.
Word does, however, include a little-known function intended for the addition of graphics to an envelope by means of specially named autotext entries. Autotext entries can be used to place a variety of information - not merely graphics - so lend themselves to the task of adding alternative return addresses.
The example shown in Fig.1 places a formatted return address across the top of the envelope, with an accompanying graphic.
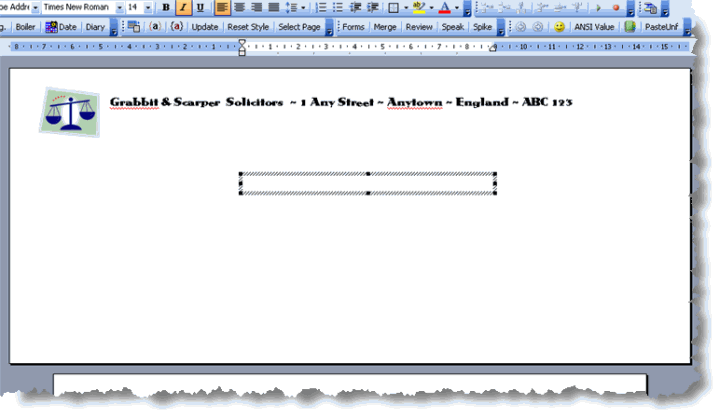
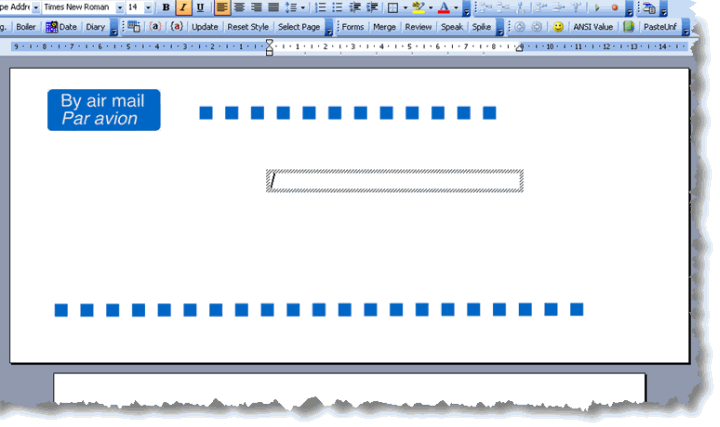
Fig 2 shows the same technique used to place an airmail stamp and attention stripes.
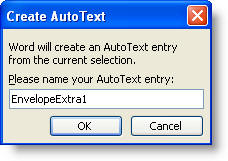
To achieve this, create a paragraph style for the return text - It can be any style name other than EnvelopeAddress or EnvelopeReturn. Apply the style to the text, select and save as autotext entry called EnvelopeExtra1.
In the case of graphics, position the graphic, then select and press ALT+F3 to save as an Autotext entry.
This and EnvelopeExtra2 are the reserved names for this function.
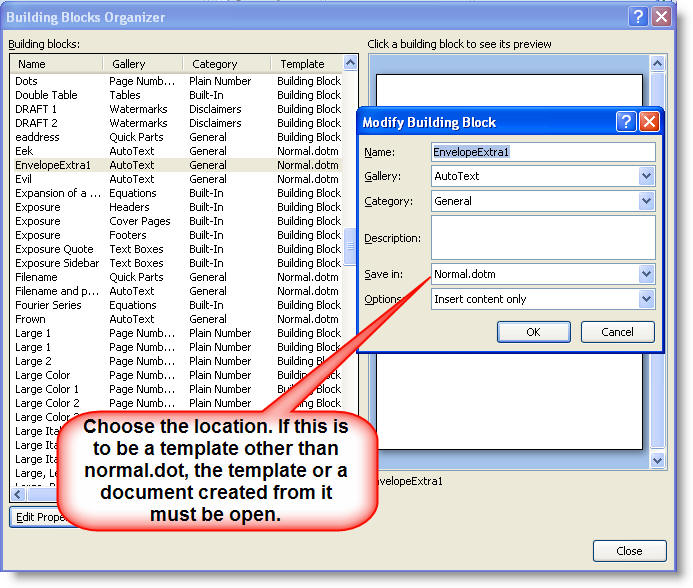
For Word 2007/2010 users, the EnvelopeExtra(1 or 2) should be saved in the document template as a building blocks entry as follows:
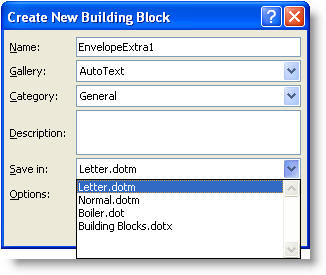
The graphic is floating so that needs a separate Autotext entry of its own - EnvelopeExtra2. If the graphic is in line, you can save the text and graphic in the one autotext entry, but you may not be able to achieve the alignment you require.
You can save multiple floating graphics in the same autotext entry.
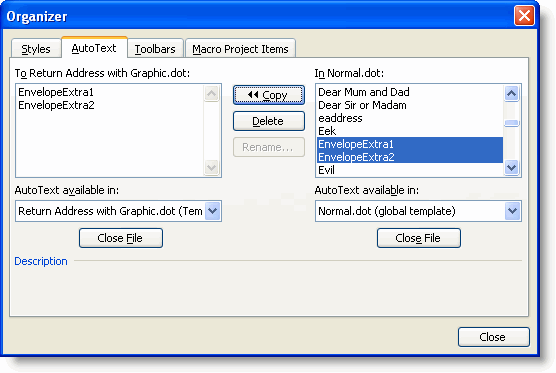
The autotext entries and their matching paragraph style need to be stored in the template with the matching letterhead. So with the template in question open for editing, open the organizer (Alt+F8 > Organizer) and copy the paragraph style and the two autotext entries to the template.
Delete the entries from normal.dot.
In Word 2007/2010, Autotext entries are not handled by the Macro Project Organizer as in earlier versions, but through the Building Blocks Organizer, and it is a simple matter to save the entry where it is required from the creation dialog, however the location can be changed to that of any open template:
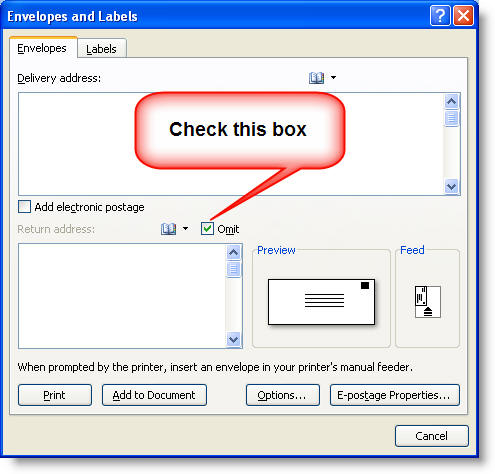
All that remains is to run the envelope wizard from the template. Make sure that the 'Omit' return address box is checked, or you will get the default return address as well as the autotext. The dialog shown below is from Word 2007, but the dialogs for all the Word versions are similar.
This procedure can be used with each different letter head template which requires a return address on the envelope.
A slight variation for Word versions before 2007, would be to save the autotext entries not in document templates, but in global templates.
Normally a global template would be installed in the Word startup folder and the autotext entries it contains would be available, as though they were stored in the normal template. Obviously this is not much use if you want to use alternative return addresses, but there is nothing to stop you from paging-in global templates as required.
The trick is to create a folder to contain such paged templates and the obvious place to create such a folder is as a sub-directory of the Startup folder. In this example, the startup folder is called Unused Templates. The name is unimportant, but with Word 2007 to 2016 ensure that this folder is setup as a trusted folder in Word's Options > Trust Centre Settings.
Create your templates, using the method above, and save them in this folder with easily identifiable names. E.g. if you are producing material for Bloggs & Co - call their add-in template Bloggs.dot.
From Tools > Templates and Add-ins, (Developer Tab > Document template in Word 2007, 2010 to 2016) add the template(s) and uncheck the box(es).
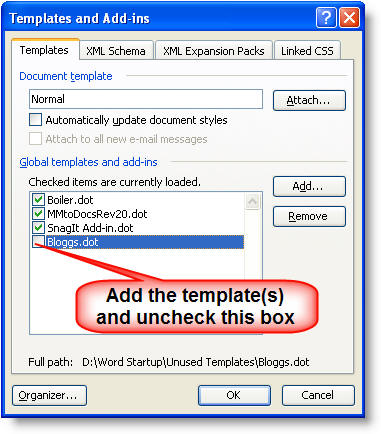
When Word is restarted, the entry will remain in the list and as this is not a startup folder, it will not be checked or installed automatically. In order to use the autotext entries put a check mark in the box adjacent to the appropriate template.
This can be done manually or by macro stored in the Normal template e.g.
Sub AddInBloggs()
With AddIns("D:\Word Startup\Unused Templates\Bloggs.dot")
.Installed = Not .Installed
End With
End Sub
will toggle the availability of the Bloggs.dot autotexts.
See also the add-in to load add-ins for the current session.
A More Versatile Approach
This standard approach is not the end of the story. If you use several return addresses, a handy trick is to delete the user information address in Word's Options > User Information > Mailing Address.
Remove any existing autotext entry called EnvelopeExtra1 or 2 created as described in the previous sections.
If, on running the envelope/label wizard, a return address still appears in the window, delete it from there and, with the omit return address button unchecked, add the envelope to a document. You should get a prompt asking if you want to save the new return address - you do!
You should now have no return address.
Type your return address on the envelope you have added to the document, as you wish it to appear, and save as an autotext entry - you can include graphics if you wish.
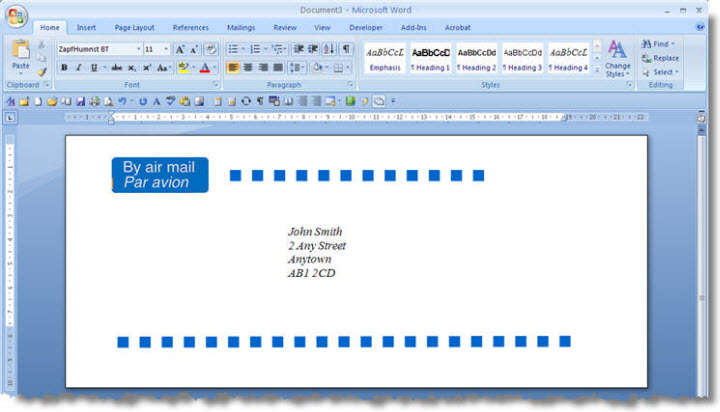
I use this procedure to create airmail logos on envelopes as illustrated below. The same technique can be used to add any return addresses and/or graphics to envelopes.
Use a simple name like (in the example) 'Airmail'. Do NOT use the names EnvelopeExtra1 or 2 !!!
Repeat for any other address(es) you wish to use.
To use the return addresses. Run the envelope/label wizard. Type the autotext name you wish to apply to the envelope e.g. 'airmail' in the return address window (see below) and press F3. Depending on what you saved in the autotext, you may not see much change. Graphics, for example, will not appear in the box; but you will see the result when you add the envelope to a document or print it from the wizard.
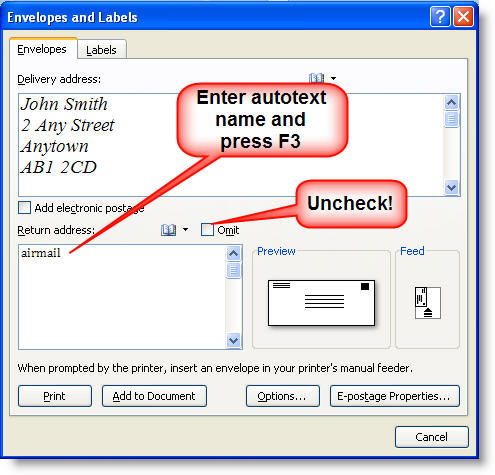
Whenever you make a change in the return address window, Word will ask if you wish to save the changes you have made as the default return address. It is essential that you answer NO to this question.
The result could be as shown below. For the purpose of illustration, the envelope with its airmail graphic has been added to a document. It could equally have been sent directly to the printer.
A template using this airmail envelope layout and automated to interface with Outlook addresses is available for download from the Downloads page.
Return addresses
This page shows how to add elements other than simple return addresses to envelopes and how to use alternative return addresses, e.g. for typists who prepare letters for different offices.
See also the Envelopes and Labels add-in which simplifies the process.